|
|
|
|
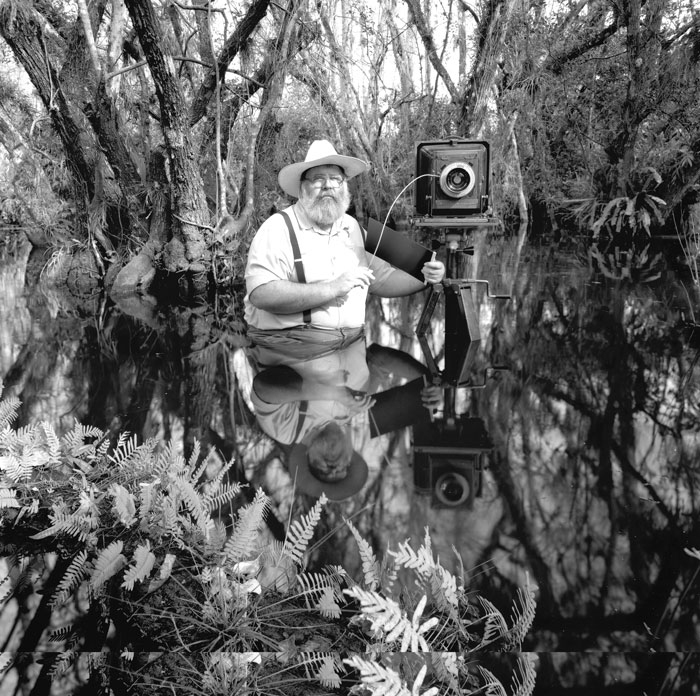
I have a passion for View Cameras.
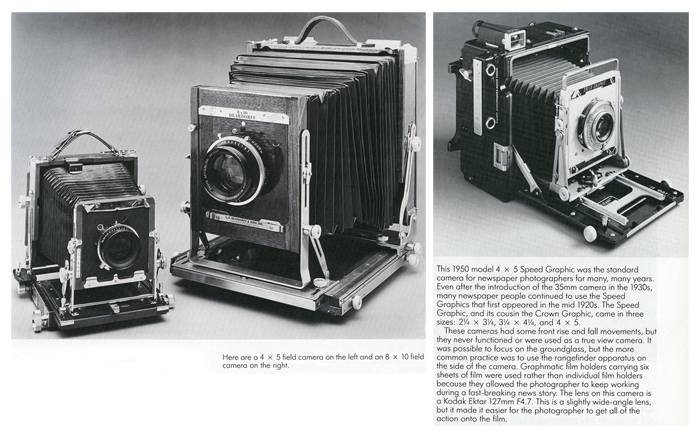
For me it's the ultimate photographic tool! If you keep reading ahead you will understand what I mean. With it I can do things that cannot be done with any other camera, more on this later. And of course there are also things you cannot do with it. I can't take a View Camera and go out in a fast pace to the streets making quick shooting images. In the past Graflex Speed Graphics, was used for those occasions, a View Camera, were the reporter photographs all around, with those big round strobes attached to it, as you can see on Weegee catching that big moment.
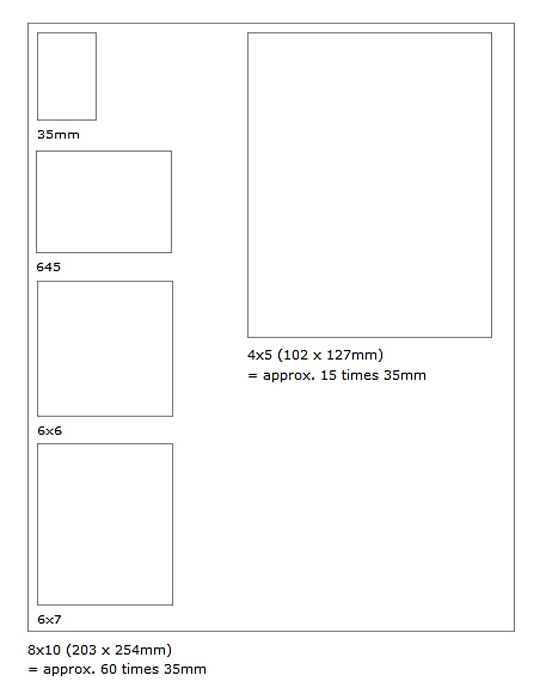
The image quality has something to be seen to believe it. The level of detail on a large format negative, goes beyond any other registering surface, because View Cameras work with very big negatives,.
Start by imagining for example a sheet with 8x10" (20cm x 25cm). That is almost the size of an A4 sheet. Keep your imagination running into thinking about a digital sensor that size. How much information can it hold? Well, to our thinking train here it doesn't matter if it's digital or analogue: You can have a surface this big to fill in your photographic subjects and ideas with supreme quality. Only a digital sensor that size isn't available yet. It will come, only not in the next few months. But analogue yes, it does exist, and for a very long time, right from the start of photographic history. However it doesn't stop at 8cm x10cm. Formats can go up to 11cm x 14cm, even bigger if we can handle a camera of these gigantic dimensions to play with in the field or studio.
Basically what I am talking about is something much larger than a 35mm negative, or your stunning and expensive full frame digital sensor, even a medium format one.
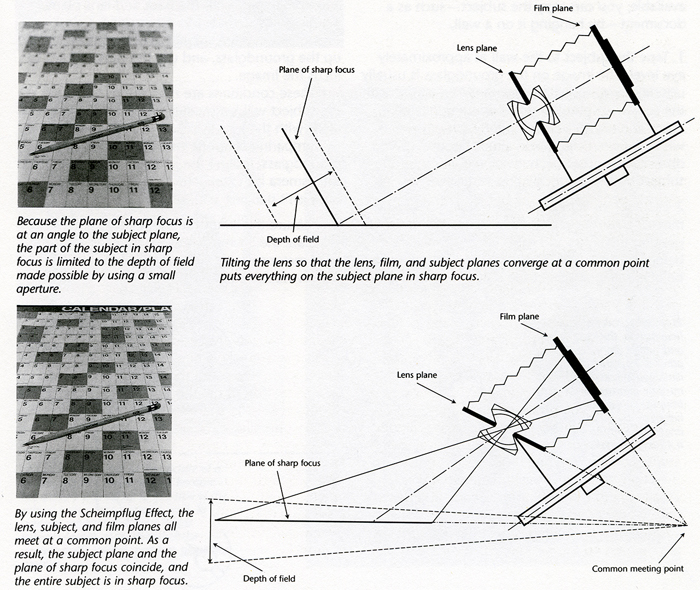
But this is just the beginning of my story today. View Cameras don't just offer the large negative advantage. The other main advantage is the ability of change the lens-negative plane relation to each other to correct perspective or change the plane of focus. And this takes us to another level of reasoning.
To me, working with a View Camera is a Zen moment feeling, a slice of time held close in another dimension. Procedures can't be rushed with a View Camera. Time stands still, slowing us down to think and compose the image carefully, making movements, focusing with great care, visualizing. And it's all up to the lens, aperture and shutter.
When I decide to stack some negative sheets into film holders and pick up one of my View Cameras to go into the field or studio, to capture something I have imagined, something I see with my inner eye, or just for the pleasure of it, my mind switches lanes into a mind frame close to that of gliding the skies in a plane with no engine, just soaring, riding the airflow, feeling the breeze, with joy at heart, but without safety net.
The View Camera is at the genesis of photography, born from the camera obscura, known as far back as 400BC. Da Vinci talks about it in his Codex Atlanticus. It started as a pinhole camera. Later a lens was added to get a much clearer, sharper image. The idea evolved and when it was technically possible given the chemical processing at the time, to fix an image permanently on a surface, it was the camera obscura, a View Camera, that was brought into action. Photography was born!
In essence, the set has three chapters: The lens, the light tight chamber bellows, and the imprint surface.
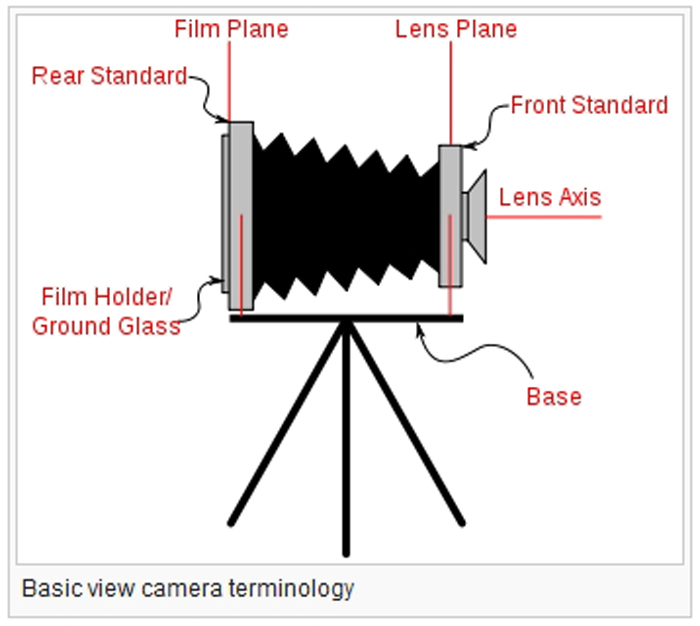
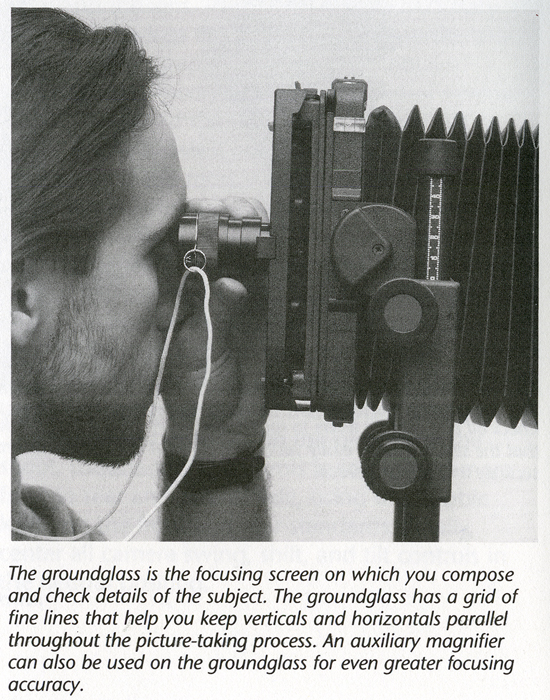
To focus, the lens moves along back and forth until a focused image is seen on the ground glass, before inserting the film holder and making the photograph. Watching the image in that big frame, upside down and reversed, is a fascinating, magical experience, also because the ground glass is just glass, with one side in rough matte finish.
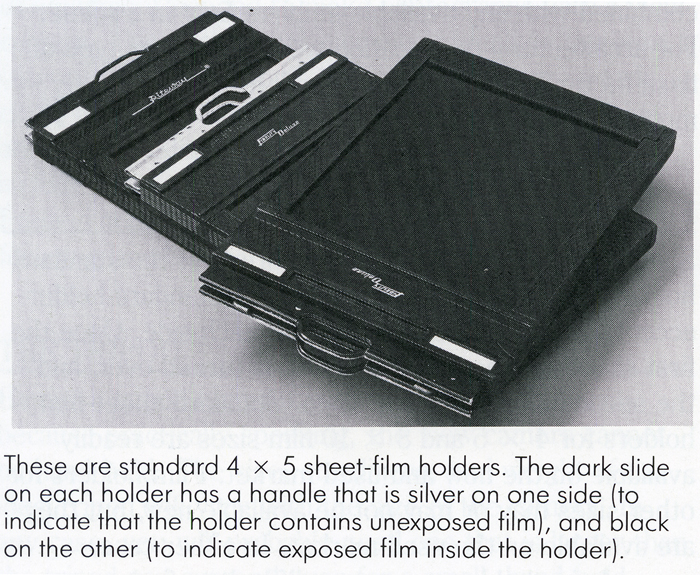
To detailing the work flow: first the film holders must be charged in total darkness. Each holder can take two sheets. Film holders are light tight, and we must take with us as much as we can, or need. Usually I have four holders, eight sheets, ready at any time.

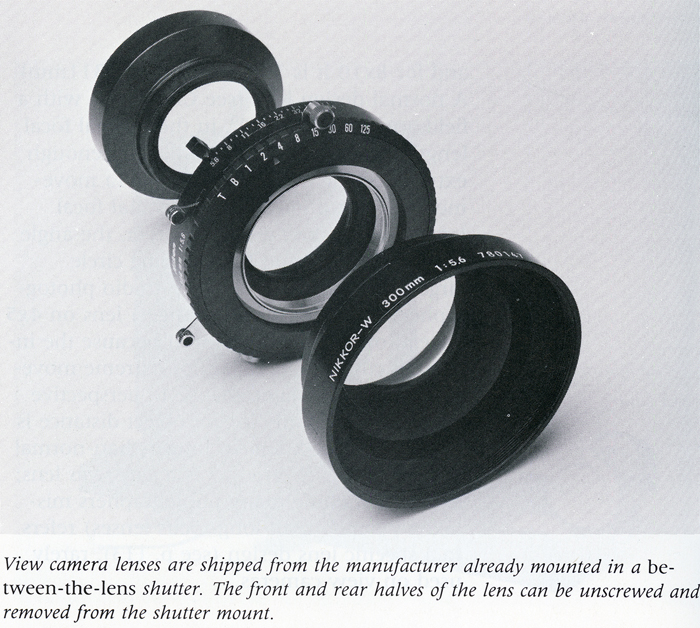
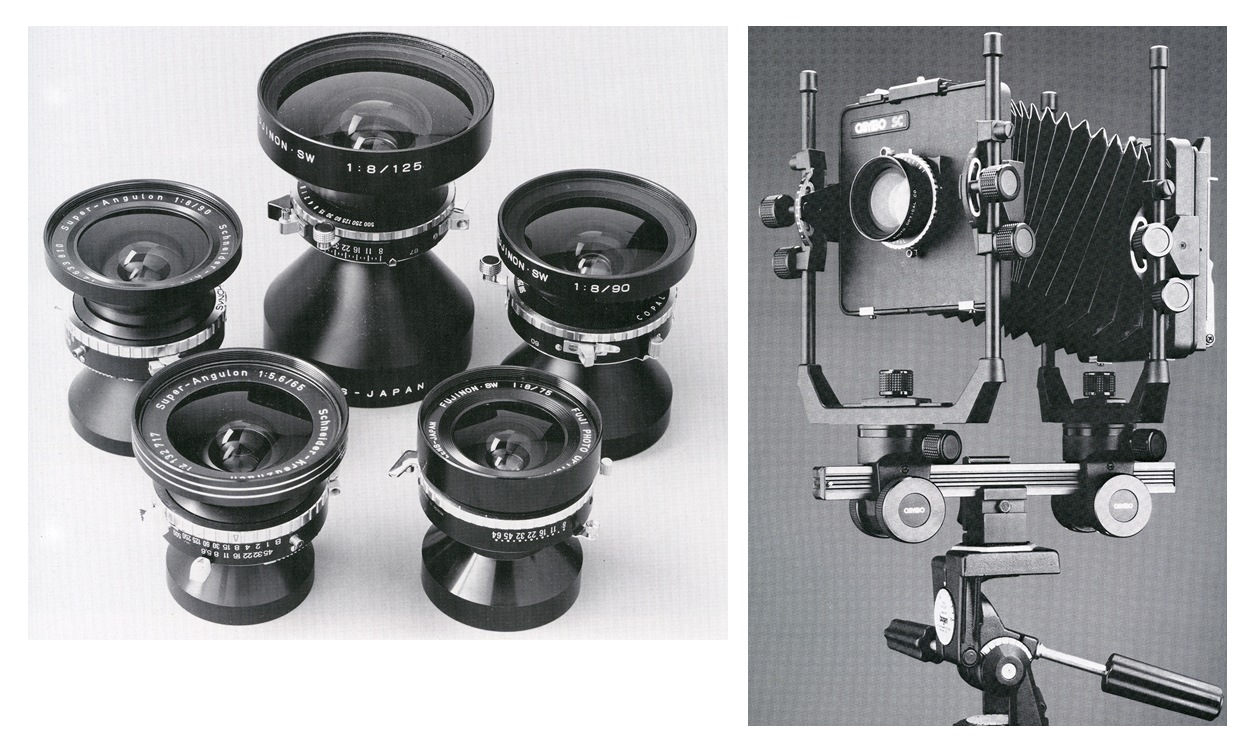
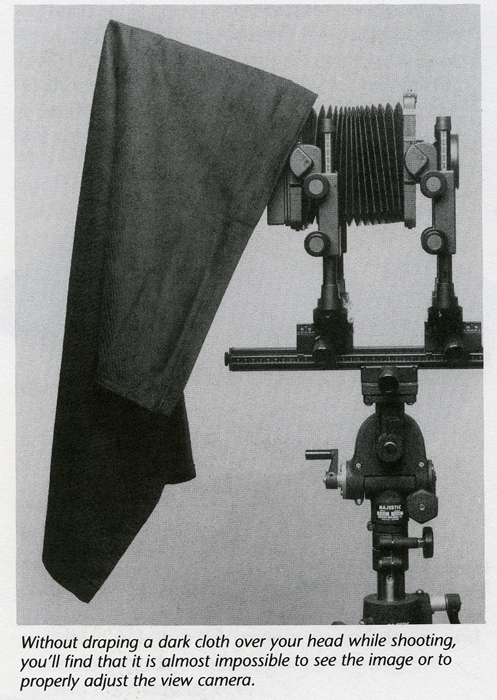
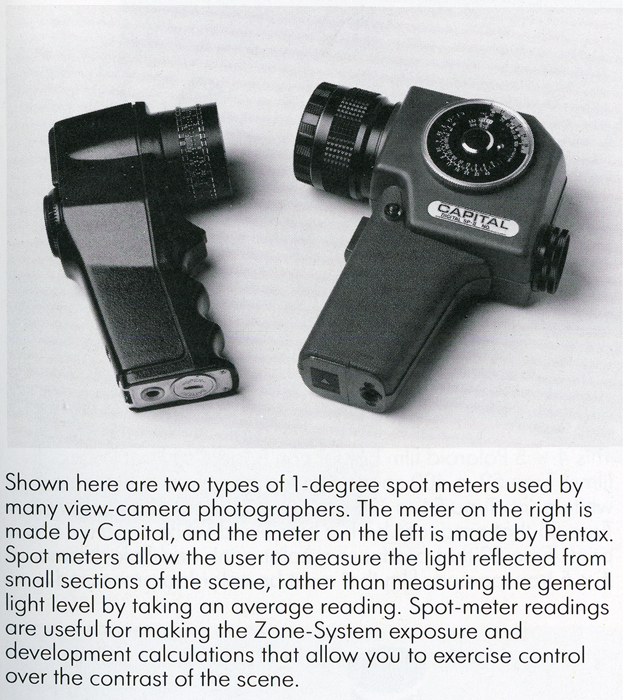
I then have to make the decision on what lens/focal lengths to use. There is no zoom feature available for large format, and each focal length requires a different lens. Depending on the work I have in mind, I will have a 90 mm, wide angle on 4 cm x 5 cm, or 180 mm, real wide on 8 cm x10 cm, and 300 mm, telephoto on 4 cm x 5 cm, or 600 mm ion 8 cm x10 cm. The concern here are image circles mostly. If too short for your film format, you may not have an image at all on the surface, and some vignetting may occur. So far in the camera bag together with the camera there are film holders and lens. Next, a tripod is a must with View Cameras. They are situated more on the heavy side and sturdiness in holding them still is mandatory. That way you can play with very small apertures, that famous f.64, and long exposure times. Cable release follows next, along with a special loupe to help with the precise focusing on the ground glass. View Camera and lens are completely manual and mechanical, so you will need a light meter, better a spot meter. More about those later. Stack in some filters for better contrast in black and white, compensating in color. And don't forget a dark cloth that enables you to glance onto the ground glass image. And off you go!
Now you're in the field, have perfect light, paid with an awesome subject for landscape or architectural photographic work, or maybe a beautiful model is ready to give you his or her best.
You fix the camera on the tripod. Attach the lens and open it so that a double reversed image gets onto the ground glass plate, and you experience again the mystic of it all. Zero in on all movements in the camera. Get your light meter, forget the camera now, and look ahead, widely, enjoy the view, let your eyes to focus on what lies ahead. Start to compose your image mentally and assess the light intuitively. Visualize the scene, think what details are important, where you want the light exposure to be on the final photograph. Apply the ‘sunny 16 rule’ and make a light meter reading. Compare the two. Move close to the ground glass and measure what you see, move the camera on its axes. Move it around from place to place. Evaluate. A perfect composition according to your aesthetic parameters, that is what you're looking for. If aiming at a focal plane near the camera, the best option will be incident light measure. If aiming for far away, take spot readings. Choose a dark area where you will want to show detail on the finished photograph. Then move the spot meter to a highlight area of choice and calculate the difference between the two readings. Five points apart is what the negative can hold.
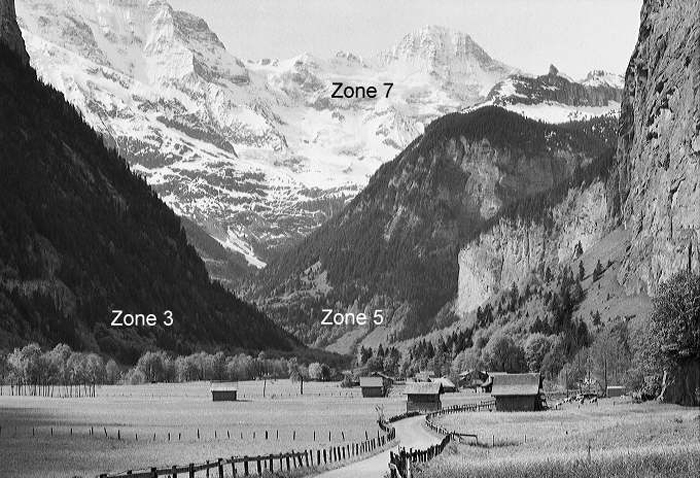
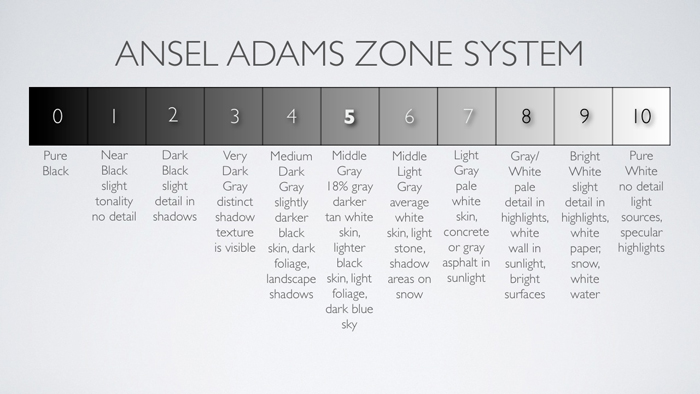
If there is more, then it will be a high contrast image , and you willunderdevelop your negative to compress the scale. In this case under develop by 30% (30% less time than standard development time) for each additional zone apart. If there is less contrast, overdevelop. Take the meter reading on the dark areas. The light meter will always place the result in a middle range. Close your measure two points, placing it on zone 3. There are roughly 11 zones. Zone 0 is pure black, transparent on the negative. Zone 10 is pure white, black on the negative. Zone 5 is important, being middle gray, and that is where the exposure meter places its reading. Also important are zones 3, black with detail, and 7, white with detail. We want our negatives to be readable between these five zones, from 3 to 7.
Now we will use that reading from an an appropriate dark gray and place it on zone 3. For example: on a spot reading we get f4/60; now to place it on zone 3 either choose f8/60 or f4/250 and go ahead with the shooting. It's all in the pre- visualization of your scene.
But you may still want to think more before hitting the cable release. Following our subject, we may need to use the possibilities of the View Camera related to movements, the ones your particular camera model and make will allow.

For a landscape theme, maybe also for still life close-up work, the one standards adjustment that I find most useful and important is the ability to have everything in focus right from the foreground underneath the lens all the way to infinity. That adjustment is done by tilting the front standard forward. Play with it, refocus, until you have a perfectly focused image on the ground glass from top to bottom.
Use the help of a magnifying glass directly on the ground glass to achieve supreme sharpening. As you are on a tripod, that gives the chance to work with really small apertures, up to f.64, used by the group around Ansel Adams and Edward Weston , resulting in enormous depth of field.
Now we have the image composed, light measured and values inserted into the lens control, adjustments of front standard done. Now it's time to get a film holder from the bag. Recheck that everything is tight, fixed, leveled (most View Cameras have small levels conveniently placed) and secured. Close the lens, arm the shutter, and insert the film holder.
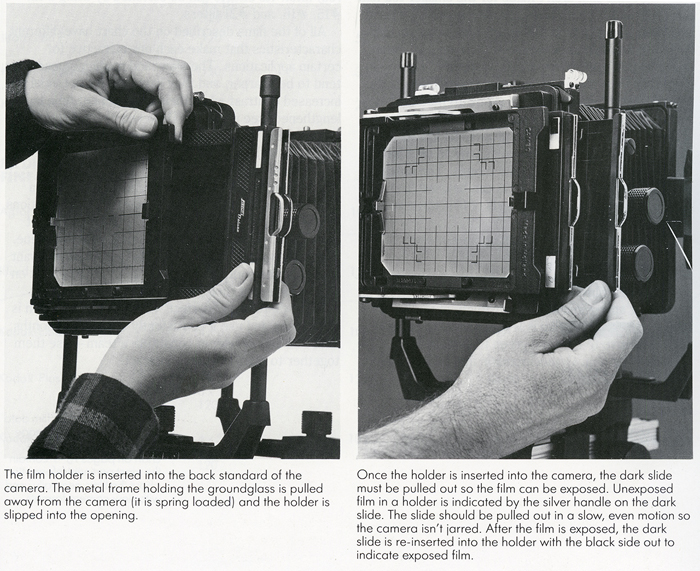
Pause and let the camera shake stop. Hold the cable release and if on landscape or studio stills, release the shutter. If on human shooting, speak your instructions if any, tell where to look or whatever, tell a quick story or a thought to get that expression you set for and click! Done. Rush for the film holder and close it inserting the dark slide in reverse. That way you know that this side has been exposed.
Here is a checklist for beginners:
- Choose the camera position and level the tripod and camera.
- Open the lens to full aperture.
- Focus roughly using the focusing knob.
- Adjust the composition while looking at the ground glass.
- Focus precisely with tilts/swings, using a magnifying glass.
- Determine exposure by careful light metering the scene.
- Consider the use of filters.
- Close the lens, cock the shutter, and insert the film holder.
- Set the aperture and shutter speed.
- Remove the dark slide.
- Look at the subject.
- Fire the shutter with a cable release.
- Put the dark slide back in, reversed from how it was before exposure.
- Remove the film holder.
Now I thought it would be interesting to look as some amazing photographic projects that have only been possible by using a View Camera.
Take a look at the photographs by Massimo Vitali. He has this work in progress where he goes to public crowded spaces such as beaches, nightclubs, public squares, and alike. The book on beaches is my favourite. He arrives at the beach early. With two assistants assembles and places a high tubular tower, 6 to 9 meters high, with a platform on top, in a convenient and presumably well chosen place, on sand, sometimes water. And by a stair on the side he mounts his 11 cm x14 cm format View Camera, then waits for people to arrive.
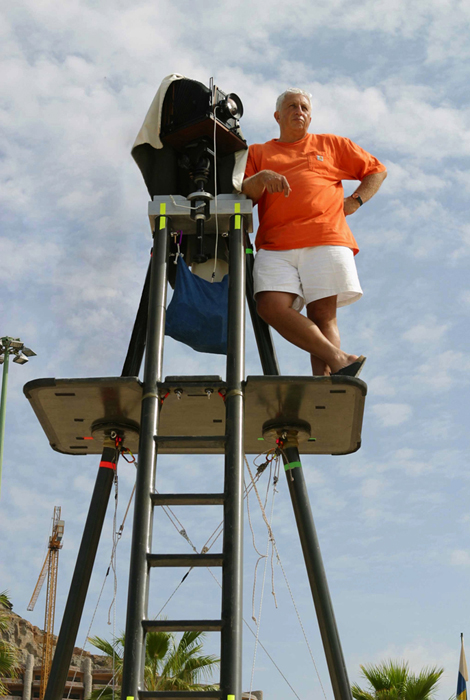
Soon after the initial curiosity they don't notice him any longer. Then he takes action. Are you seeing it? Isn't that fascinating? Those photographs can be read at so many levels. And you may be thinking: I can do that with my my own DSLR camera equipment. Yes you can, but the result will be something else, because this level of detail you are looking at here can never be achieve other Than with a View Camera.
Now change views and take a look at another book, if you can, on a project from Txema Salvans, entitled:” the Waiting Game”.
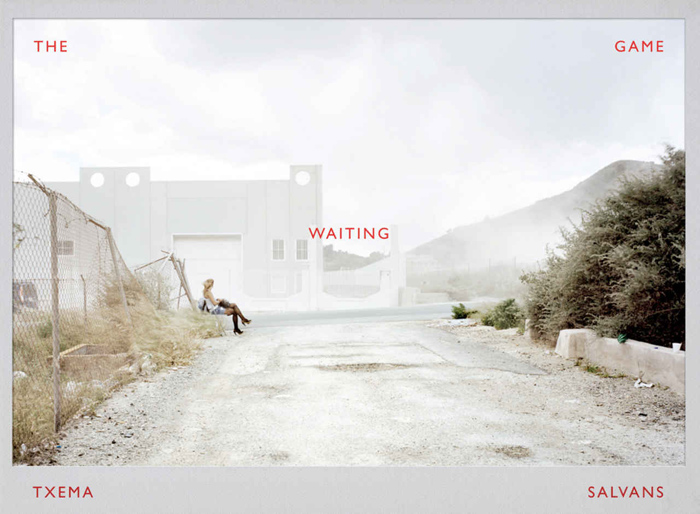
How can someone go out into the side roads around cities and highways in southern coastal Spain and photograph prostitutes on hold for clients and not be kicked off the premises? Can you guess the answer? There are many approaches to this task. You can ask for permission, hit and run, or do it unnoticed, as the photographer did. By using a miniature camera? Hiding behind a bush? No, just being around with big 8 cm x 10 cm View Camera! Incredible, right? Here is how it was done: With and assistant carrying a mirror target, both dressed with reflective yellow jackets, a van on the side, disguised like working road men, and handling around the View Camera mounted on a yellow tripod like it was a theodolite, topographers doing their job taking readings on the field. They even went and talked to the girls, hey, I'll be around working, stay as we are not here. Soon enough also in this setting they did not pay attention and the photographers did the work quietly. They were invisible. Fascinating, isn't it? Only film and big colour negatives can deliver that feel and look in an almost physical way.
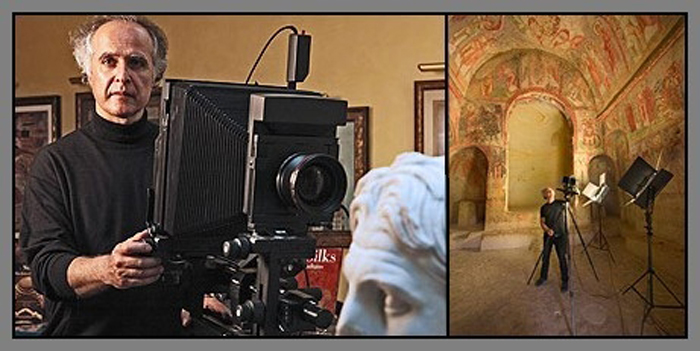
There is still one book I invite you to look at, entitled:” Performance”, by Richard Avedon. To say Avedon is one of my favourite photographers is an understatement, also because he was a real View Camera stylist.
As you browse through this particular book, those high quality photographs, that unique vision, those portraits capturing emotions, full of fast action and living joy in a studio, these creative people performing in front of the camera, was this done with a 35 mm camera on the move? No! Those black and white full range and dynamic photographs were done with a studio camera on wheels, a slow to handle contemplative View Camera!
I have used my View Cameras for landscape projects, diving deep into zone system use, thinking about detail in shadows areas carefully crafting around filter use to achieve that contrast where I want it, and in this way delivering the image closest to what my eyes have seen; on b&w look at the incredible work done with 8 cm x 10 cm View Cameras by Clyde Butcher, or by Joe Cornish with his 4 cm x 5 cm Ebony View Camera on positive film. The work of both photographers is breathtaking!
I have further done studio portrait work whenever possible, Here 8 cm x 10 cm delivers absolutely outstanding results.
Another field is architectural photography. Converging lines corrected right there in the field with front standard adjustments to reach that top building into frame, are a considerable advantage. Interior work is more complex because of light color and differences between artificial light sources and natural light, if both present. You will have to use tungsten balanced film with some compensating filter to deal with other light sources. An expensive color meter will be helpful to determine the levels of compensation and filters to use. This has been successfully done for over 50 years with beautiful results. Just look at the work of Ahmet Ertug done with state of the art View Cameras: your jaw will drop to the floor!
I like to use View Cameras also for still life work at home or on a light table, making adjustments to get sharp focus along the surfaces, horizontal or laterally, by tilting and swing the front standard of the camera.
Another opportunity for View Camera use is macro photography. Your only limit will be the extension size of the bellows. Just play with it and see how much you can focus with bellows fully extended along the rails.
Yes, I think that by now you may want to buy a View Camera, or at least try one. You may already have some ideas for photographs. By the way, if you are in Lisbon, or passing by, you can try your hand and look at mine, free of charge, for some demonstration. Just give me a call.
Here is what your starter kit should be:
- The View Camera itself, a 4 cm x 5 cm will already give you all the options you need; they are usually sold without lens, sold online at the usual sites, or sold in specialized camera stores; if you plan to take the camera out into the field, a folded camera is the right choice, but maybe a little more expensive. If you plan to use it only indoors, then a monorail is perfect.
- A large format lens, 90 mm, or 150 mm maybe, this one will be equivalent to 50 mm for small 35mm size, and they are widely available at affordable prices; all large format lens are of superior quality at all levels, so it really doesn't matter that much what you get, just try to pick up a clean one, no fungus or surface scratches, and if possible assure the shutter speeds are accurate, and aperture blades freely running in and out.
- A tripod, the sturdiest you can afford.
- A dark cloth, so that you can peek comfortably into the ground glass, to do your focusing; a clean black old t-shirt will also do.
- A magnifying glass, specially designed for that purpose, around 8x magnification, to do that pin point focusing over the ground glass.
- A few film holders, 4 to start with; you can buy them new but second hand will do the trick for much less money.
- A cable release, to avoid camera shake, that you may already own.
- And of course don't forget the light meter; any one will do, but a spot meter for landscape outdoor work, is the most useful.
- Optionally, get some filters, contrast filters, yellow to red filters, for B&W, or warm and compensating filters for color work; gelatine are better but glass round ones are perfect, always get the best available.
- For field work a backpack is a must; depending on the camera you got, a big model may be the one to go for. There is lot to stack and move around as you see already.
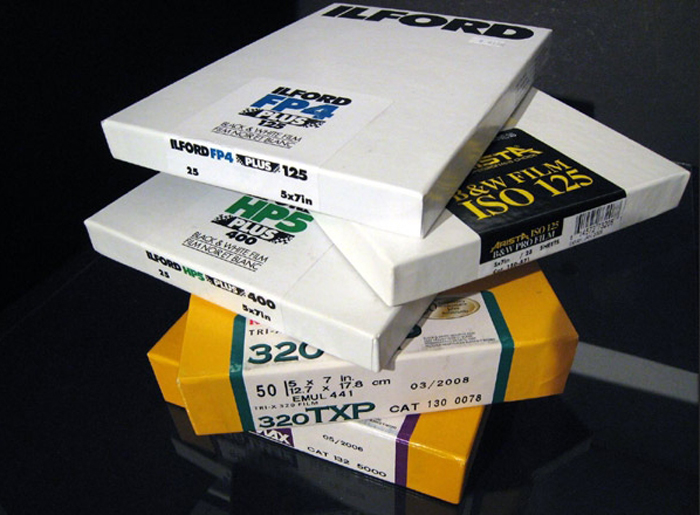
- And film. Of course the choice is still vast. Sheet film is not cheap. But as all of it is of high quality, you can really stick to your budget and achieve supreme results. The best way is to get it from online stores. The price weight per sheet is one more factor to consider when you are planning your photography. Digital is so cheap that it is almost free of charge. You can shoot a 1000 takes and one will be good almost certainly. Not also with those film holders and what is inside them, one more reason for you to think carefully before hitting the trigger.
So let's go for it. Time for the thrill of your life. Fill in a couple of film holders with some sheets. Don't forget, total darkness on loading. It takes practice. Do it first in the clear with some wasted sheets or cut some paper to the right size to practice.
Backpack is ready? Nothing left out? Then stop reading and get out of here to do some shooting!... ...did it go well?
Sure it did, although with film photography we never know. Now you have to develop those precious negatives that hold their surprises, and we can hardly wait.
How do we develop?
Two options here:
-take it to a lab for some pro work; if you don't have it in your hometown send it to a lab somewhere, there are plenty to choose from on the internet.
-DIY, some more money spent, but it's worth it; I do it myself only for b&w; color is much more difficult. One has to maintain among other details, precise temperature control on the baths; for 4 cm x 5 cm negatives I use a Paterson orbital tank, 4 sheets at a time, for 8 cm x10 cm a big Jobo tank, 2 sheets at a time; chemicals are the same for small versus medium formats, as is the work flow.
When the negatives are dried, that amazed first time look at them is something you won't forget. Positive sheets, exposed to perfection, are absolutely beautiful to look at. 8 cm x 10 cm slides are a pure delight to stare at!
Two more options here:
-print those negatives the conventional way, enlarger, photo silver paper, chemical tanks, developer, stop bath, fixer, washing, drying; large format enlargers are big and expensive, at 4 cm x 5 cm size they are still manageable, but at 8cm x10cm they are completely out of the ordinary possibilities, so for this format or bigger only contact printing is available; I have a LPL 4cm x 5cm enlarger, that does also small formats to all medium size film formats, and I can tell you, a print from a 4cm x 5cm negative, even bigger sizes, is a marvel to enjoy, the level of detail is amazing; of course you can give away the negatives for some professional lab printing, but means giving up the control over your work.
-alternatively get your scanner ready, if the one you have has masks to stick in those big negatives, and scan them; from there on everything is known to you, except that you will get really large files, full of information that can't be collected any other way. For example, a scanned file from a 8cm x 10cm negative can have many thousand megabytes of info on file, where can that be achieved?
So this is it. With a View Camera you are at the heart and soul of photography. What is written here was just an appetizer for the real meal to follow.
Along with the camera these are the books I recommend for you to read.
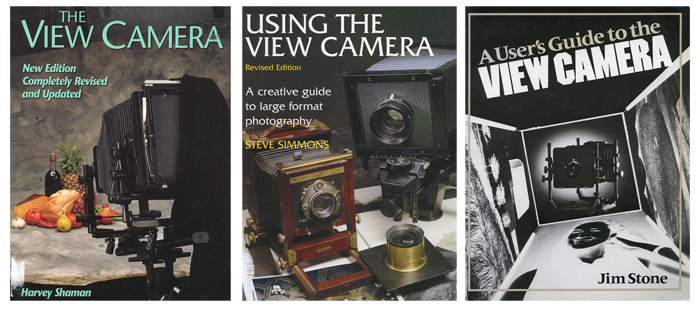
If you want to pick only one, choose the Simmons. I have them all, each one gives special insights into this tool which is full of possibilities. To play with the basics is not difficult, but to do serious work some technical skills must be mastered. These are not point and shoot cameras. But to read and understand how this piece of art, a View Camera, works, is something of the most useful any photographer can do!
Mastering the basics of its operation will already be enough for you to change the way you look at photography... for the better, of course!
 | Write |
 | Matthias Leberle Either the author or the editor/lector got it all wrong during most of the article when it comes to measurement units combined with large format negative/photo formats.
I believe the latter is the case - and quite frankly I think it´s kind of embarassing for a photography website with such high claims. |
 | elias Very wonderfully, passionately written; your words and your work definitely inspire. Thank you for taking the time to share. |
 | Paulo Abrantes PRO Hi Raul..., what a great article...! stunning reading for me. many thanks and congrats. cheers |
 | Nick van Dijk Hola Raul, thank you for this ' refresh'! Maybe one day i'll have the patience or inspiration to get my old Sinar 4x5 from the attic .... This article certainly wets the appetite!
Thank you Yvette for getting this together,
Grtz, Nick |