by Christian Pabst
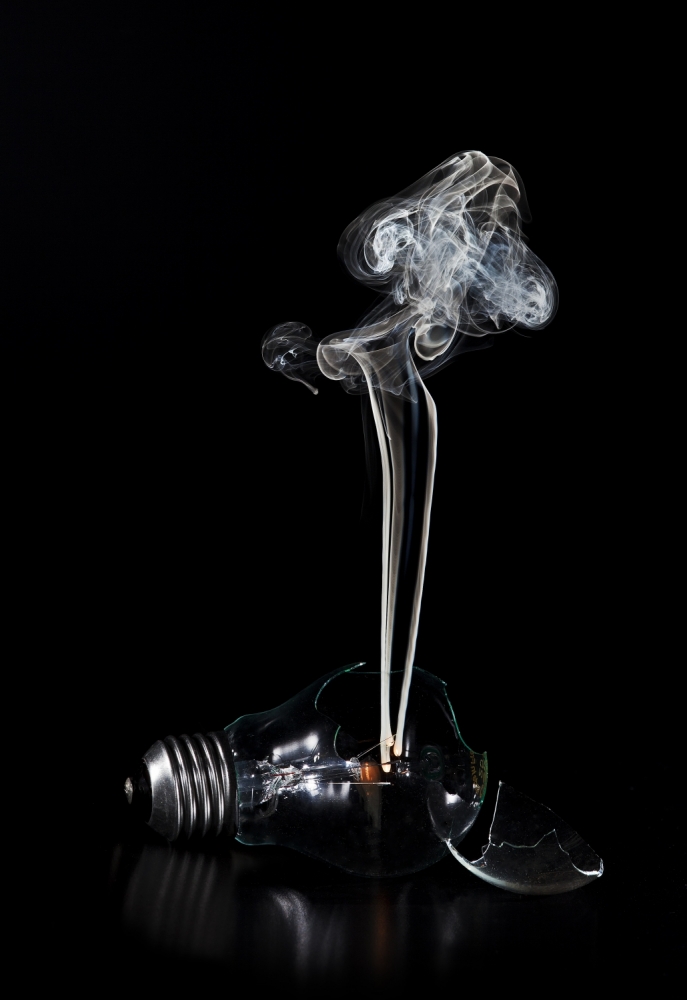
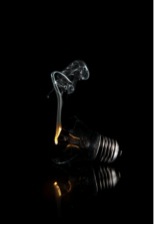
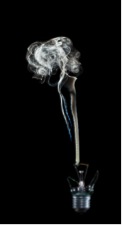
In the winter when it's cold outside and there are only a few hours of daylight, I like to shoot indoors. I try to create effective yet simple, minimalistic photographs of everyday objects. On this day, I decided to smash a light bulb and photograph the shapes of the smoke that the glowing filament produced.
Canon 5D Mark II . Sigma 105mm macro f/2.8 . 105mmmm . 1/125ss . f/13 . ISO100
This time I intended to take a picture of a broken light bulb just before the filament stopped glowing. I first needed to break off a piece of the glass bulb without destroying the filament. I placed the light bulb between two bricks on top of a stone slab, touched a screwdriver to the top of the bulb and then hit it with a hammer. After trying this on ten light bulbs, I ended up with six suitably broken ones.
"It is very important to put a dimmer in between, which allows you to reduce the current so that the filament only glows."
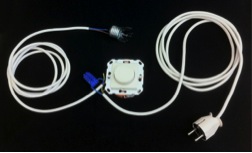
Next, I connected the light bulb to electricity as shown in the picture below. I soldered the ends of a double stranded wire to each electrical contact at the base of the bulb and put a plug on the other end. It is very important to put a dimmer in between, which allows you to reduce the current so that the filament only glows. Be sure to use a bulb with no more than 40 or 60 watts and use the dimmer on a very low setting. That way, the filament will not burn in a quick, explosive moment; instead, it will glow and produce a beautiful trail of smoke.
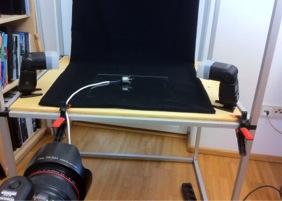
I put black cotton material on my table and on the background. Then I put a thin sheet of glass on the table's surface to produce good reflections and positioned the bulb on top of it. You can see the arrangement in the picture below:
"When you switch on the dimmer with one hand and release the shutter with the other hand an instant later, be careful to not produce air swirls that could disturb a beautiful trail of smoke."
On both sides I placed radio-controlled flashes and set them to 1/16 power without using automatic TTL. When you're photographing smoke, you will get the best results by lighting it from the side. Also, strobes allow short exposure times to freeze the moment when the smoke begins to rise and the filament is still glowing. When you switch on the dimmer with one hand and release the shutter with the other hand an instant later, be careful to not produce air swirls that could disturb a beautiful trail of smoke. If you release the shutter at nearly the same time that you switch on the current, you get a beautiful glowing filament with a cloud of smoke around it. If you release the shutter a few moments after you switch on the current, the glow will have faded, but you will get a long trail of beautiful, heavy smoke. It's worth experimenting to see which result you prefer.
Post-processing was done in a few minutes in Photoshop.
1) In a Levels adjustment layer, I watched the histogram as I darkened the background to an absolute black, making sure to only leave a glimmer of the reflection on the glass surface.
2) I used the Dodge tool to lighten the smoke.
3) Using the Clone Stamp tool, I easily removed the wire by replacing it with the black background.
1) Without the current turned on, you can arrange your set, make your adjustments and take test shots until you are satisfied with the result. When you are completely set up, switch on the current and take your shot: the short glow will not affect your exposure.
2) If the reflections from the flashes on the light bulb are too strong, cover the flashes with a piece of white paper to diffuse the light.
3) Safety first! It's important to wear protective goggles when you're smashing the light bulb.
4) You also should always wear thin cotton gloves when touching the light bulb to keep it clean of dust and fingerprints. That will save a lot of work in post-processing.
5) Of course, you must be careful with electricity. Be sure that you do not touch any part of the entire arrangement while it is plugged in. Only connect the wire to electricity for the short time you need to take the picture. Keep it unplugged the rest of the time.
I was born in Graz, Austria, in July 1964. My first contact with photography was when I turned 18. Ever since then I have been fascinated by this subject, and ten years later it became my one and only passion. I started with landscape and macro photography, but I later became very interested in tabletop, still life and high-speed photography. I love to take complete control of the light when using flash. These days I seem to gravitate toward minimalism; I try to reduce things around me to their bare essentials and show only the lines and surfaces that make up the object. Photography is a fascinating, endless journey.