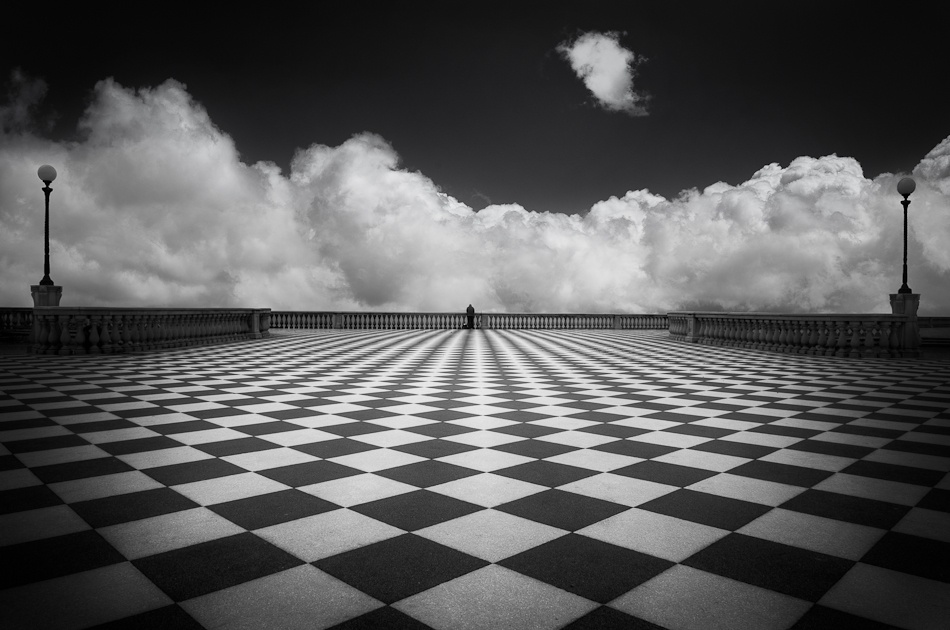
I had this shot in my head long before I traveled to Italy, and finally I was standing there in person, my camera in hand. The symmetry, the black and white tiles, the wide-open expanse — everything was perfect. Now, if only something magical would happen to set my photo apart from all the others I had seen.
I had the privilege of going to Tuscany with some friends this spring. A month before we went I sat down and did some research. I stumbled across some pictures of La Terrazza Mascagni in Livorno, a walkway beside the sea with black and white squares and wide-open space. I knew instantly that it was a place I wanted to go since I shoot almost exclusively in black and white.After we arrived I spent some time shooting at the location, but the light wasn't right. It was a clear blue sky, and I wasn’t that happy with the outcome. My friends, who are more into nature photography, felt it was time to move on and so we went for lunch. This was when the magic happened. Right before we found a suitable restaurant, I noticed that the sky had suddenly changed out over the sea. So I rushed back to the square to try some more shots.
"When my camera was in place, I waited for that moment of absolute perfection — and that's when a fisherman suddenly walked into my frame."
The symmetry of everything was just fantastic, and I knew I had to capture it. When my camera was in place, I waited for that moment of absolute perfection — and that's when a fisherman suddenly walked into my frame. The man looked at me, and then walked down to the edge overlooking the sea and just stood there. I wanted to get as much texture and contrast as possible. I hoped to exclude all of the people except the fisherman, so I decided to use High Dynamic Range imaging (HDR) and long exposures to help me with this. I also used a B+W Neutral Density 10-stop filter and a Cokin graduated filter. I took seven shots at different exposures and went back to lunch much happier than I was a couple hours before. This picture is a fine image to have in my small collection. When you are a beginner such as myself, it’s exciting when you get an image like this. I ended up using it for a project about dreams. I usually have pictures like this in my head for months before I take them and can’t get the picture out of my head before it’s taken. I don’t go out and just point and shoot. I plan my pictures, often in great detail since, for me, that’s what photography is all about.
Back at home I used Photoshop CS5, Photomatix and Nik Software's Silver Efex Pro 2 plugin to process the image.
1) I started by merging all seven pictures together in Photomatix. I wanted to retain the details, but I didn’t want to overdo the HDR. I ensured it was a smooth transition.
2) Then I exported the merged image to Photoshop CS5. I started to clean up the image by removing sensor dust spots from the sky. It was then that I decided that I really didn’t like the sky in the picture; it looked more like a roof and was a bit messy. I had a shot in my photo archives that might be better, so I loaded it into Photoshop. Using the Rectangular Marquee tool, I selected the sky I wanted and copied it. I then pasted it onto the picture and dragged it into position.
3) I selected the background layer, went to Select > Color Range and set Fuzziness to 96 to select only the foreground. Going back to the sky layer, I made a layer mask and deleted the lower portion to get the sky perfectly in line with the selected foreground. I usually have to do this a couple of times before I get it right, and sometimes I even go in and paint with a small Brush to get it exactly right.
4) After this I had a picture I wanted to work with. However, everything was too symmetrical; I wanted to add something interesting. I went to my cloud collection in my archives and found a little cloud that fit perfectly. Adding it on a new layer, I used a layer mask to blend it in. Since both skies had the same color, it wasn’t that hard to get a good result.
5) I then exported the image to Nik Silver Efex Pro 2 plugin and converted it to black and white. I added a little bit of Contrast and Brightness before pressing Apply, and that created a new layer. Back in Photoshop, I wanted a darker and almost black sky. So I copied the new layer and changed the layer's blending mode to Multiply. This made the whole picture very dark, so with a layer mask I painted away everything except the sky and changed the layer Opacity to around 70%.
6) When working with black and white images, I tend to use Silver Efex Pro more than Photoshop. Therefore, again in Silver Efex Pro, I gave the image more Contrast, and I created a small, dark Vignette to give it a more centered feel.
7) I then made some adjustments to the Structure and turned it down so the effect wasn't too harsh.
8) Returning to Photoshop, I created a new empty layer, filled it with 50% grey and, using a fairly big white Brush with an Opacity of 3%, I simply painted where I wanted the picture to be brighter.
9) I saved the picture as a TIFF file, and a week later I posted it on the web.
1) I picked up my first camera in the beginning of 2011. While I was developing my photographic skills, I found it very helpful to look at pictures similar to the ones I wanted to take. I studied the photos and searched the web for tutorials on how to make them, including the 1x tutorials. I then tried to replicate them and to learn from my mistakes.
2) I think HDR has been given a bad name, and I guess that is because people often tend to overdo it. When shooting black and white, it's actually a great way to go if you want more detail and contrast.
3) An easy trick in post-processing to help you if you aren’t happy with the light is a technique that I use in almost every picture I take. First, make a new layer, set its blending mode to Overlay or Soft Light and fill it with 50% grey. Then using black or white and a big soft Brush with Opacity set between 1% and 5%, I just paint in the light I'm after.
I'm from Sweden. I've experienced a lot of things over the past years. I've seen lives being lost and new lives begin. I began listening more closely to my creative voice in the beginning of 2011. It was then that I started documenting the things and the people that moved me with an iPhone camera. After many months of hard work, I finally went down to the store and bought myself a DSLR. Over the past few years, I've traveled to many places far away and met people from different religions and cultures who have shown me a different way of life: a life that has helped me to surround myself with creative people.