I have seen many great photos of dogs running, but I have not come across a photo with two dogs — both sharp, both in the same depth of field and both running. So I thought it would be a good challenge to see if I could accomplish this.
Having dogs means you have to take them out for many walks. Having a camera means you can sometimes combine the two. I am lucky enough to have a great forest and a great beach nearby, and the dogs really enjoy running full speed there. They are very well behaved, so it is not too hard to get images of them running towards me.
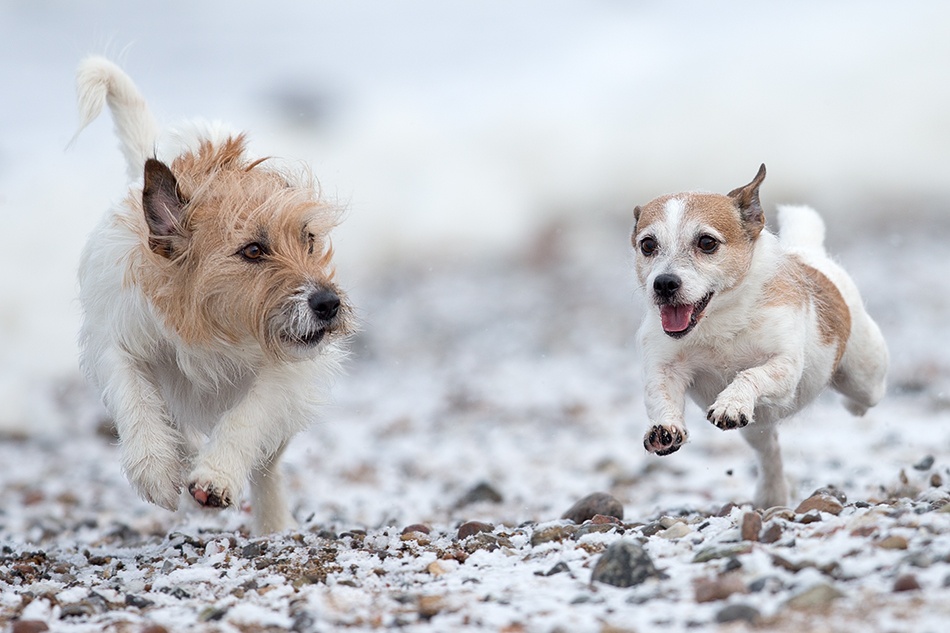
Canon 1DX . Canon 300mmf/2.8 . 1/1250ss . f/2.8 . ISO200
I loaded my dogs into the car and drove to the beach one February afternoon in 2013. The light is best there at that time of day. Even though it was partly cloudy, the light was still good for this location. Seagulls are always there, and the smell of the beach is wonderful. It makes the trip worthwhile even without the camera and dogs. I have been there many times with the dogs, so as soon as we get close to the beach, they suddenly become very excited. They love being my models, or at least, I like to think they do.
"When I photograph my dogs running, I prefer to do it from a low angle, and even though it was a frosty cold February morning, there was no excuse to not lie down flat on the beach."
When I photograph my dogs running, I prefer to do it from a low angle, and even though it was a frosty cold February morning, there was no excuse to not lie down flat on the beach. It produces a much more interesting photo, and it also supports the lens and keeps it steady. I used a Canon 1DX and a Canon 300mm f/2.8 IS II lens for this photo; it's a perfect combination for this kind of shooting. Sometimes I use the 1.4x extender, but this time I didn't. What I love about the 300mm is that it gives me more time with the dogs at a good distance from me, compared to a lens like a 70–200mm, which greatly reduces the amount of time the dogs are at an optimal focusing distance. Using a longer lens, like my 600mm, is also a possibility for this type of shot, but it's quite heavy and it would require me to shoot the dogs much further away, and I like to keep them relatively close by on the beach. Another reason I prefer to use the 300mm lens is that I can shoot at an aperture of f/2.8, which is great for those cloudy, low light days.I shoot in Manual mode whenever I can, but with fast-changing light conditions, I use Aperture Priority mode. I constantly watch my histogram as I shoot, making sure that my exposures reach the point just before the highlights start clipping. The sun was behind the light clouds, coming in from my right, but the snow on the ground served as a great reflector. For this image I used manual exposure, an aperture of f/2.8, ISO 200 and 1/1250 second shutter speed. I chose f/2.8 so the depth of field would be as shallow as possible; I only wanted the dogs' heads in focus and the rest blurred. The shutter speed is just fast enough for the image to be sharp using a 300mm lens on the 1DX. If I was photographing a small, flying bird, I would use a much faster shutter speed, but for my dogs 1/1250 second works just fine.
"I tried to keep the focus on one of their heads, and once they came close to the optimal distance, I fired away. Twelve frames per second really helps out!"
As I was shooting, the most difficult part was instructing the dogs to run exactly next to each other; I missed so many frames trying to work out a system to capture them together. The big dog, Else, is faster than Ida, but Ida is a better starter. So I placed Ida about three feet (one meter) ahead of Else, walked about 30 or 40 feet (10 or 12 meters) farther than I thought my optimal distance for the photo was, lay down flat on the beach, got ready and then called them. I tried to keep the focus on one of their heads, and once they came close to the optimal distance, I fired away. Twelve frames per second really helps out!I took about 600 photos that day, and I actually ended up with only two that I liked. When I am out in the field and review my images on the camera's LCD, I often think, "yes this is great," only to be disappointed when I view the RAW file at home on the monitor. If it is not as sharp as it should be, I discard the photo. These sessions typically take about an hour; sometimes I wind up with no keepers, but sometimes I get a few. In the winter, it is also a matter of keeping warm. I do not use gloves when I shoot because I don't feel that I have enough control with them on. For this one, I was very happy with the result. I do not always obtain the exact frame I had hoped and planned for, but I can plan similar situations and keep trying, hoping one of them will give me a goofy look, or even "the eye of the tiger."
I always shoot in RAW format because I like having the extra information in the RAW files that JPEGs do not have. I use Adobe Camera Raw and Photoshop CS6 to process my images.
1) I opened the RAW file in Camera Raw, set Highlights to –3, Shadows to +4 and then exported a 16-bit TIFF file to Photoshop CS6.
2) I used the Crop tool to crop away about 40% of the image. I then applied the Levels tool and set the values to 0, 1.04 and 247. I have no standard way of doing this; I always look at the image and the histogram to see how it looks and what happens to it as I make changes.
3) I then opened the Shadows/Highlights tool and set the Shadows to 2%.
4) I sharpen the image in two steps — essentially slightly sharpening twice as I downsize the image twice. But before adding sharpness, I convert the color profile from RGB Color to Lab Color (Image > Mode > Lab Color). I then make sure that only the Lightness channels are selected (under the Channels tab in the Layers Panel). The sharpening seems much more natural when only using the Lightness channel for this.
5) For the photo I uploaded to 1x, the final resolution was 950 pixels on the longest side. So first, under Image Size I changed the Width dimension to 1900 pixels and then applied the Smart Sharpen filter, Amount set to 45% and Radius set to 0.3 pixels. I returned to Image Size, changed the Width dimension to 950 pixels and then applied another Smart Sharpen, this time Amount set to 35% and Radius set to 0.1 pixels. Again, I look at the image as I set the Smart Sharpen values to see what looks natural; I have no set values that I always use.
6) I went back to Image > Mode and converted the color profile back to RGB Color. The final step was to select Save Image As, change the Format to JPEG and set Quality to 10.
1) Learn your autofocus and tracking system so you will know how to deal with it under various conditions.
2) Lie down to photograph pets at their eye level; this will give you the best angle to shoot the image, create the best foreground and background and you will capture their expressions much better as well.
3) Go back again and again and continue to shoot the same kind of photos. Those unique situations will pop up when you least expect it. You can plan some of the shoot, but to capture the uniqueness, you will need a bit of luck in addition to skill.
I live on the border of Gribskov, one of Denmark's largest forests. I've been photographing with a DSLR for about five years. My primary targets are birds of prey, preferably in flight. My dogs are great practice for this since many of the autofocus considerations apply to both birds and dogs. My day job is in the field of cancer research, trying to predict the optimal chemotherapy (personalized medicine) for each individual instead of treatment as a group. I am the head of a lab north of Copenhagen, Denmark.
A photo of mine was awarded as the best Danish bird photo of 2012, and it was also displayed worldwide by many media outlets, such as Discover Magazine, BMC Ecology, BBC, The Guardian and National Geographic. I also collaborate with Canon Denmark, giving workshops and talks about wildlife photography.
Being outdoors with the camera (and my dogs) is a great way to get my mind back on track after many hours of focusing in the lab.