While I was preparing for my trip to Uganda, I dreamed about the photos I wanted to take: some were based on my own creativity and others were inspired by the nature books I had read and the documentaries I had watched for many years. One of my favorites that I very much wanted to capture was a picture taken at dawn showing the typical African light and colors, along with the silhouettes of some of the big mammals that live there.
I have always been a big fan of nature. When I was a child, I went to the countryside with my grandfather where I wrote down everything that I saw and experienced. Time passed, and although my professional path went in other directions, I have always kept that love and admiration for nature. I picked up photography later (as an adult), using small analog cameras that have long since been forgotten due to the high cost of developing film. I got my first digital reflex camera around 2000. Eventually the obvious happened, combining my two biggest passions from childhood and adulthood: nature (especially fauna) and photography.
In 2012 I had the opportunity to take a trip to Africa — something that I have always wanted to do. I chose Uganda so I could observe the mountains gorillas, and for 18 emotionally charged days I visited most of the national parks throughout the country.
Canon 5D . Canon 300mmf/2.8L . 300mm .1/640s . f/2.8 . ISO400
I do not own prime lenses. I mostly use zoom lenses, and because it would not be possible to move from place to place carrying a lot of equipment, some lenses had to stay at home. That's why this picture was taken with a 300mm lens.
"I had starred this specific park on my journey as an ideal one for getting an image like the one shown here since it had all of the typical characteristics of the African savannah."
People who have been on a photographic safari in Africa know the routine. You wake up before dawn to enjoy the moments when the fauna is more active. You rest during the warmest hours, and then you're back in action again in the afternoon. On this day I woke up before 6:00 a.m. in Queen Elizabeth National Park. I had starred this specific park on my journey as an ideal one for getting an image like the one shown here since it had all of the typical characteristics of the African savannah. It had rained a lot the day before, but dawn arrived clear and with high clouds. I prepared my equipment, my backpack included, making sure I had my telephoto lens even though there wasn't enough light to use it. I also thought about taking a 50mm lens that I had brought on the trip specifically to use on this morning.
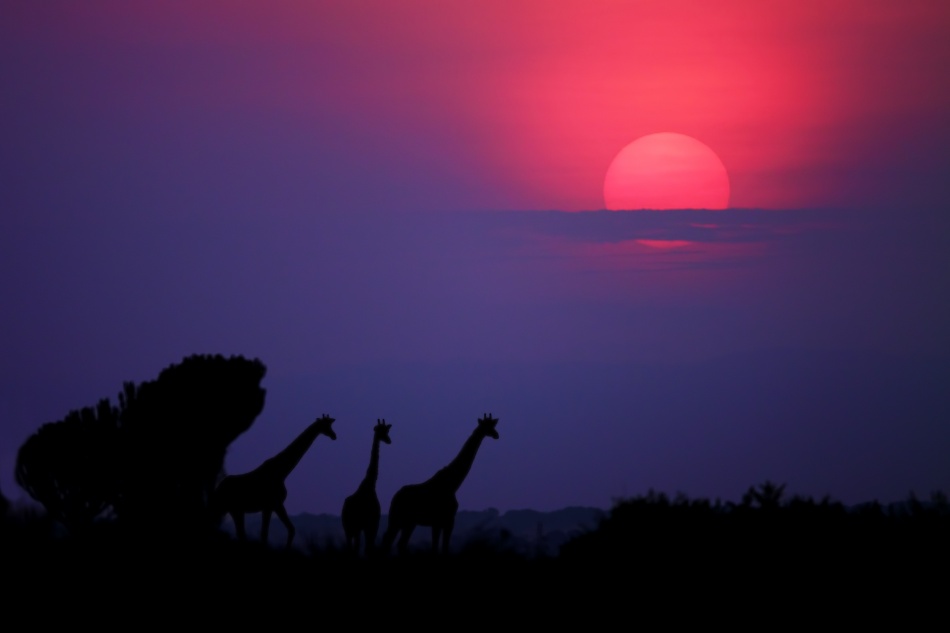
"In the few moments at dawn I took many pictures at different exposures, but we did not see any big animals, so I was unable to take the photo I had dreamed about."
After we had driven around in the 4x4 for about 30 minutes on nearly impassable roads, I realized that I had forgotten to bring the 50mm lens; I left it in my other backpack in the hotel. So I had to adapt to the new situation and reconsider how I would capture the photo that I had hoped to take, now with the 300mm lens as my only option. That day was not particularly lucky, photographically speaking. In the few moments at dawn I took many pictures at different exposures, but we did not see any big animals, so I was unable to take the photo I had dreamed about. Even though those three days in the national park were really gratifying as far as locating, observing and photographing the fauna, I never had another opportunity to attempt my dawn dream shot with better conditions. Back at home, after I had processed many pictures from the trip, I remembered that morning at dawn and searched for the photos on my hard drive. I realized that the scene actually had a lot of potential since it had such beautiful tones. Still, I had no images of the silhouettes of the animals that are so characteristic there, which were an important part of the ultimate African photo that I envisaged.
"Although it's not a habit of mine, I decided to create a photomontage to see if the result would satisfy my expectations. In the end, it did."
I carefully scoured the hard drive, and I found another picture that I had forgotten about, mainly because the composition wasn't ideal. It was shot in Murchison Falls National Park, a place in Uganda where it's quite common to see groups of giraffes. Although it's not a habit of mine, I decided to create a photomontage to see if the result would satisfy my expectations. In the end, it did.
I am not a big fan of montages in nature photography. In fact, most often when I'm processing my pictures, I only make small Curves, Levels and Contrast adjustments to enhance the details. But I am one of many who considers photography to be an art form, and as is the case in all forms of art, you can express an idea any way you want. So in this case, the picture is a combination of two images — the landscape taken at dawn and the other of the giraffes.
I processed the photos in Digital Photo Professional (DPP), the free RAW processing software provided by Canon, Photoshop CS5 and Topaz DeMask 3 plugin.
1) Starting with the RAW image of the landscape in DPP, in the RAW tab I decreased Brightness to -1.00, set White Balance to Daylight, increased Contrast to 2, and decreased Highlights to –2 and Shadows to –3.
2) Color Tone remained at 1 and Sharpness at 5 (these values were already made in camera; DPP keeps all adjustments that are set in the camera when taking the picture). By selecting the RGB tab I could see how these adjustments affected the image in the histogram.
3) Returning to the RAW tab, I reduced Brightness again to –2 and increased Contrast to 4.
4) In the NR/ALO (Noise Reduction/Auto Lighting Optimizer) tab, I decreased the Chrominance Noise Reduction setting to 3 (the NR/ALO values are usually adjusted automatically by DPP).
5) I converted the image to a TIFF file and exported it to Photoshop.
6) As for the photo of the giraffes, I made no adjustments in DPP because I was only interested in the silhouetted outline that I would create later in Photoshop. So I simply converted it to a TIFF file and exported it to Photoshop.
7) In Photoshop, I started with the landscape image. I duplicated the background layer, and using the Clone Stamp tool (Hardness set to 100% and a decent sized brush), I removed some tiny dust sensor spots and a few small limbs that would otherwise detract from the contours of the tree that resembled an elephant on the far left side.
8) Moving on to the giraffes, I again duplicated the background layer. I then selected the giraffes and separated them from the background using Topaz Remask 3 plugin. This plugin, with its simple and intuitive interface, creates a really good selection of complex areas. It also provides multiple options of mask hardness, with the possibility to rebuild the selection over and over until you are satisfied. Once the giraffes were selected, I copied them (Ctrl/Cmd+C) and pasted them (Ctrl/Cmd+V) into the dawn picture, creating a new layer in the Layers Panel.
9) Using the Move tool, I dragged the giraffes to the left side of the image where the grass in the foreground of the dawn image would hide their hooves. This gave a sense of depth to the image and balanced the composition: not only do the giraffes create a sense of movement from left to right, but they also add weight to the left side of the image, balancing the sun rising on the right.
10) It was not necessary to reduce or enlarge the giraffes because their proportions fit naturally into the landscape. If it had been necessary to resize them, I would have selected the Transform Scale tool (Edit > Transform > Scale) and, while holding the Shift key to maintain accurate proportions, I would have dragged a corner tab until I liked the result.
11) Next, I needed to darken only the giraffes to make them appear as silhouettes. To do this I added an Exposure adjustment layer and made sure it was right above the giraffe layer in the Layers Panel. I then turned the Exposure adjustment layer into a clipping mask by selecting it and pressing Ctrl/Cmd+Alt+G. Now that the Exposure layer would only affect the giraffes, I decreased the Exposure setting to –13.00, making the giraffes almost black so they faded into the black grass below.
12) With the giraffe layer selected, I applied the Gaussian Blur filter to it (Filter > Blur > Gaussian Blur) with a Radius of 4 pixels. The purpose of this step was to subdue the definition of the giraffes' contours, allowing them to blend in with the rest of the image.
13) The last remaining steps were to enhance only the duplicated landscape layer. I selected it first in the Layers Panel and then applied a Curves adjustment layer. It appeared right above the landscape layer, so I turned it into a clipping mask as in Step 11, pressing Ctrl/Cmd+Alt+G. I made a slight S-shaped curve by increasing the highlights and decreasing the shadows, which improved the overall contrast.
14) I applied a Hue/Saturation adjustment layer, turned it into a clipping mask also, and then increased Magentas: Saturation to +20, Blues: Saturation to +30 and Blues: Lightness to +10.
15) The third adjustment layer applied to the landscape was another Curves layer, turned into a clipping mask too. I moved the midtone control point upward a bit to lighten only the midtones in the landscape.
16) At the very end I flattened the image and saved it as a JPEG. Sometimes I use an action to apply subtle sharpening when I downsize the image and convert it to a JPEG file, but this time it wasn't necessary.
I made a lot of mistakes in the planning and execution of this picture. I did not take the proper equipment with me, I had no luck on the day I was hoping to capture the photo that I wanted, and overall I could not take advantage of the situation as I had planned.
This was my first experience in Africa, and it truly is a very different place from where I grew up. More than the obvious differences, such as culture, infrastructure, traditions, etc., life in general goes on in other ways. So it's important to anticipate problems that can happen unexpectedly and at the most inopportune times.
Instead of giving you basic advice about photography, I will tell you how to best plan for a photographic safari in Africa.
1) Take all the equipment you can carry (the more the better). There will be always a moment when you will wish you had something with you that you left behind.
2) If possible, it's a good idea to have two cameras: one with a long zoom lens and the other with a wide-angle zoom lens (between 20 and 100mm). You never know what you will come across, so be prepared.
3) Long zoom lenses give you an extraordinary quality, but they do not always adjust to the circumstances of the scene. Having a shorter zoom as a second lens will make everything easier. Based on my experience with the easily frightened fauna in my country, I took the longest zoom lens I had with the corresponding extenders to Africa. But this wasn't actually necessary. Having a long zoom lens makes you feel more comfortable in some situations (when photographing birds or small frightened mammals, for instance), but it's not a necessity to have a lens longer than 300mm when you're photographing big African animals.
4) Take a camera that works well with relatively high ISOs; it's important that your camera will perform well at 800 and above. Special moments and beautiful light that we all love can easily occur in low-light situations.
5) It's good to have a detailed plan about what you want to do and what pictures you want to take. Of course, you have to be alert because many things happen in nature that you cannot predict. But having a short list of images that you'd like to bring back home will keep you focused on your goal so you don't become overwhelmed or distracted by all the surprising African scenes you will see.
I'm from Spain. I am not a professional photographer, but I am a great lover and enthusiast of photography. Like every passion, it consumes most of my free time. As I mentioned before, with nature photography, and especially fauna, some parts of my life have merged and become one. I lose a lot of sleeping hours planning and preparing my desired picture: the one that shows animal life in its most intimate atmosphere, in that special moment when you became part of their life, and your presence no longer draws their attention. That is the most unexpected moment and the most satisfying one by far.
I work as a psychologist, and this helps me to patiently observe animal behavior so that I can better understand the way they live. For ten years this hobby has been something that has given meaning to my life, and although I still dream about transforming my hobby into my profession, I doubt that it would ever happen. I am mostly a self-taught photographer, and I am becoming more refined in observing and also in knowing what I like and do not like.
I continue to show my pictures to anyone who wants to see them, in forums, social networks and on my webpage. I am thankful for those who take the time to look at the images I have made. I hope someday that I will look at a picture of mine and see that it has a particular and personal style. In the meantime, I just try to enjoy what I do.