I traveled to Peru with my wife, my son, my daughter and another friend's family that was similarly composed. We had been there a few days, but Nazca became our first true appointment with the country's magical and mysterious past. The long-awaited flight over the Nazca Lines was extraordinary, but the Pan-American Highway remains just as awesome in my mind.
Heading south from Lima in a minibus driven by a local tour guide, the Pan-American Highway had accompanied us since the beginning of our journey. It's 30,000 miles (48,000 km) long, which makes it the longest highway in the world, starting in Alaska and ending in Buenos Aires.
Canon 5D Mark II . Canon 24-105mm f/4 . 1/640s . f/8 . ISO640
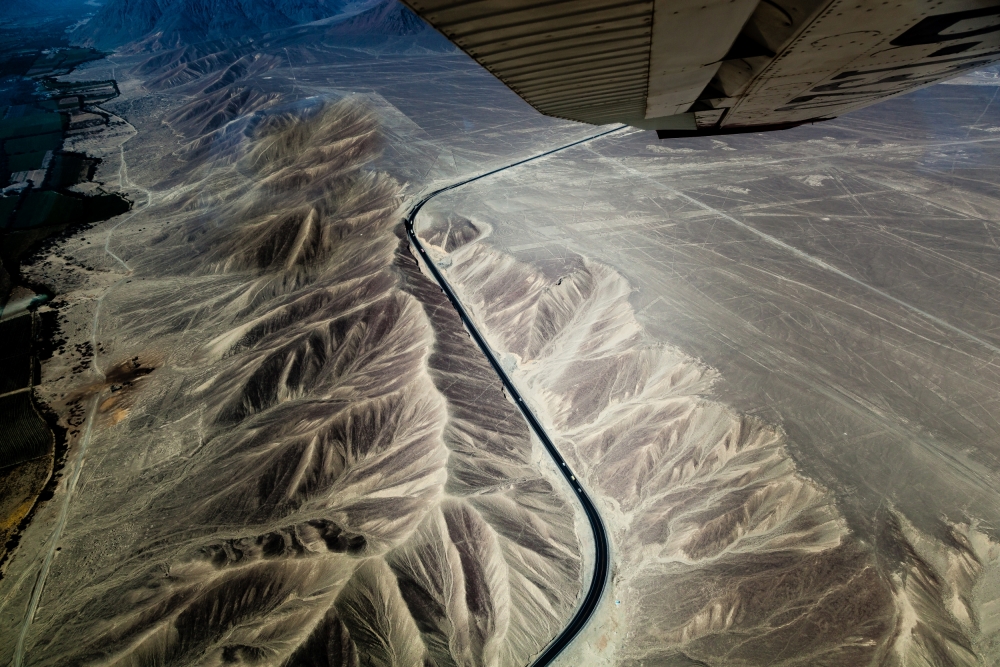
At sunset on the fourth day, we approached Nazca, and climbing the Mirador Observation Tower we caught a glimpse of the Nazca Lines (a series of ancient geoglyphs) during the golden hour. In addition to the Lines, the never-ending road immersed in the dusky orange light impressed me, appearing as a black ink drawing winding through the valley. The next morning, our long-awaited, highly anticipated day to take our flight over the Nazca Lines had finally arrived.
"The almost acrobatic flight, the limited time in the air (meaning no possibility of retrying a shot) and the nervousness due to my first time on that type of plane were the many reasons I needed to prepare for the shot in advance."
During the preparation for our trip, I read all possible tips and suggestions from tourists and photographers who had previously taken this flight. Their advice mainly referred to how to best photograph the Lines. The plane, a Cessna OB-1320, has a narrow cabin that makes it impossible to change the lens during the flight. The almost acrobatic flight, the limited time in the air (meaning no possibility of retrying a shot) and the nervousness due to my first time on that type of plane were the many reasons I needed to prepare for the shot in advance. My equipment includes different lenses, ranging from 12mm to 500mm, but deciding which one had to be my companion on the flight was quite easy: the Canon 24–105mm, my “all-purpose” best friend, won the no-contest match. Unfortunately, we did not have the opportunity to choose the flight time; we just had to sit in the small Nazca airport and wait our turn to be called for boarding. We took off around 1:00 p.m., but fortunately the harsh, midday light was not a problem for photography.
"During the flight, I experienced a constant internal battle in my head: the tourist who did not want to lose sight of anything versus the photographer who did not want to lose a shot."
The camera settings were also quite easy to decide: there was no time to study or take test shots during the flight — only to execute. I made the famous motto “f/8 and be there” mine that day, altering it a bit it with the help of my Canon EOS 5D Mark II to “f/8, Aperture Priority and be there.” I used the approaching path to the Lines to take a couple of quick shots to determine the ISO so that I always had a reliable, fast shutter speed. During the flight, I experienced a constant internal battle in my head: the tourist who did not want to lose sight of anything versus the photographer who did not want to lose a shot. Unfortunately the "acrobat flyer" side of me did not join us on the flight, so the "motion sickness" side of me surfaced every now and then.
"It covers 30 square miles (80 square kilometers), and there is no conclusive explanation regarding the origin of the ancient geoglyphs that are etched into the desert."
The view of the Nazca Lines was one of the most exciting sights I had ever witnessed. It was truly breathtaking. The area was designated by Unesco as a World Heritage site in 1994. It covers 30 square miles (80 square kilometers), and there is no conclusive explanation regarding the origin of the ancient geoglyphs that are etched into the desert. The largest figures are over 600 feet (200 meters) across: the Hummingbird, the Spider, the Monkey, the Whale, the Astronaut. There simply was no time to rest from wonder.
"The picture that I had envisaged before the trip and had remained dormant in my mind surprisingly materialized right outside my window."
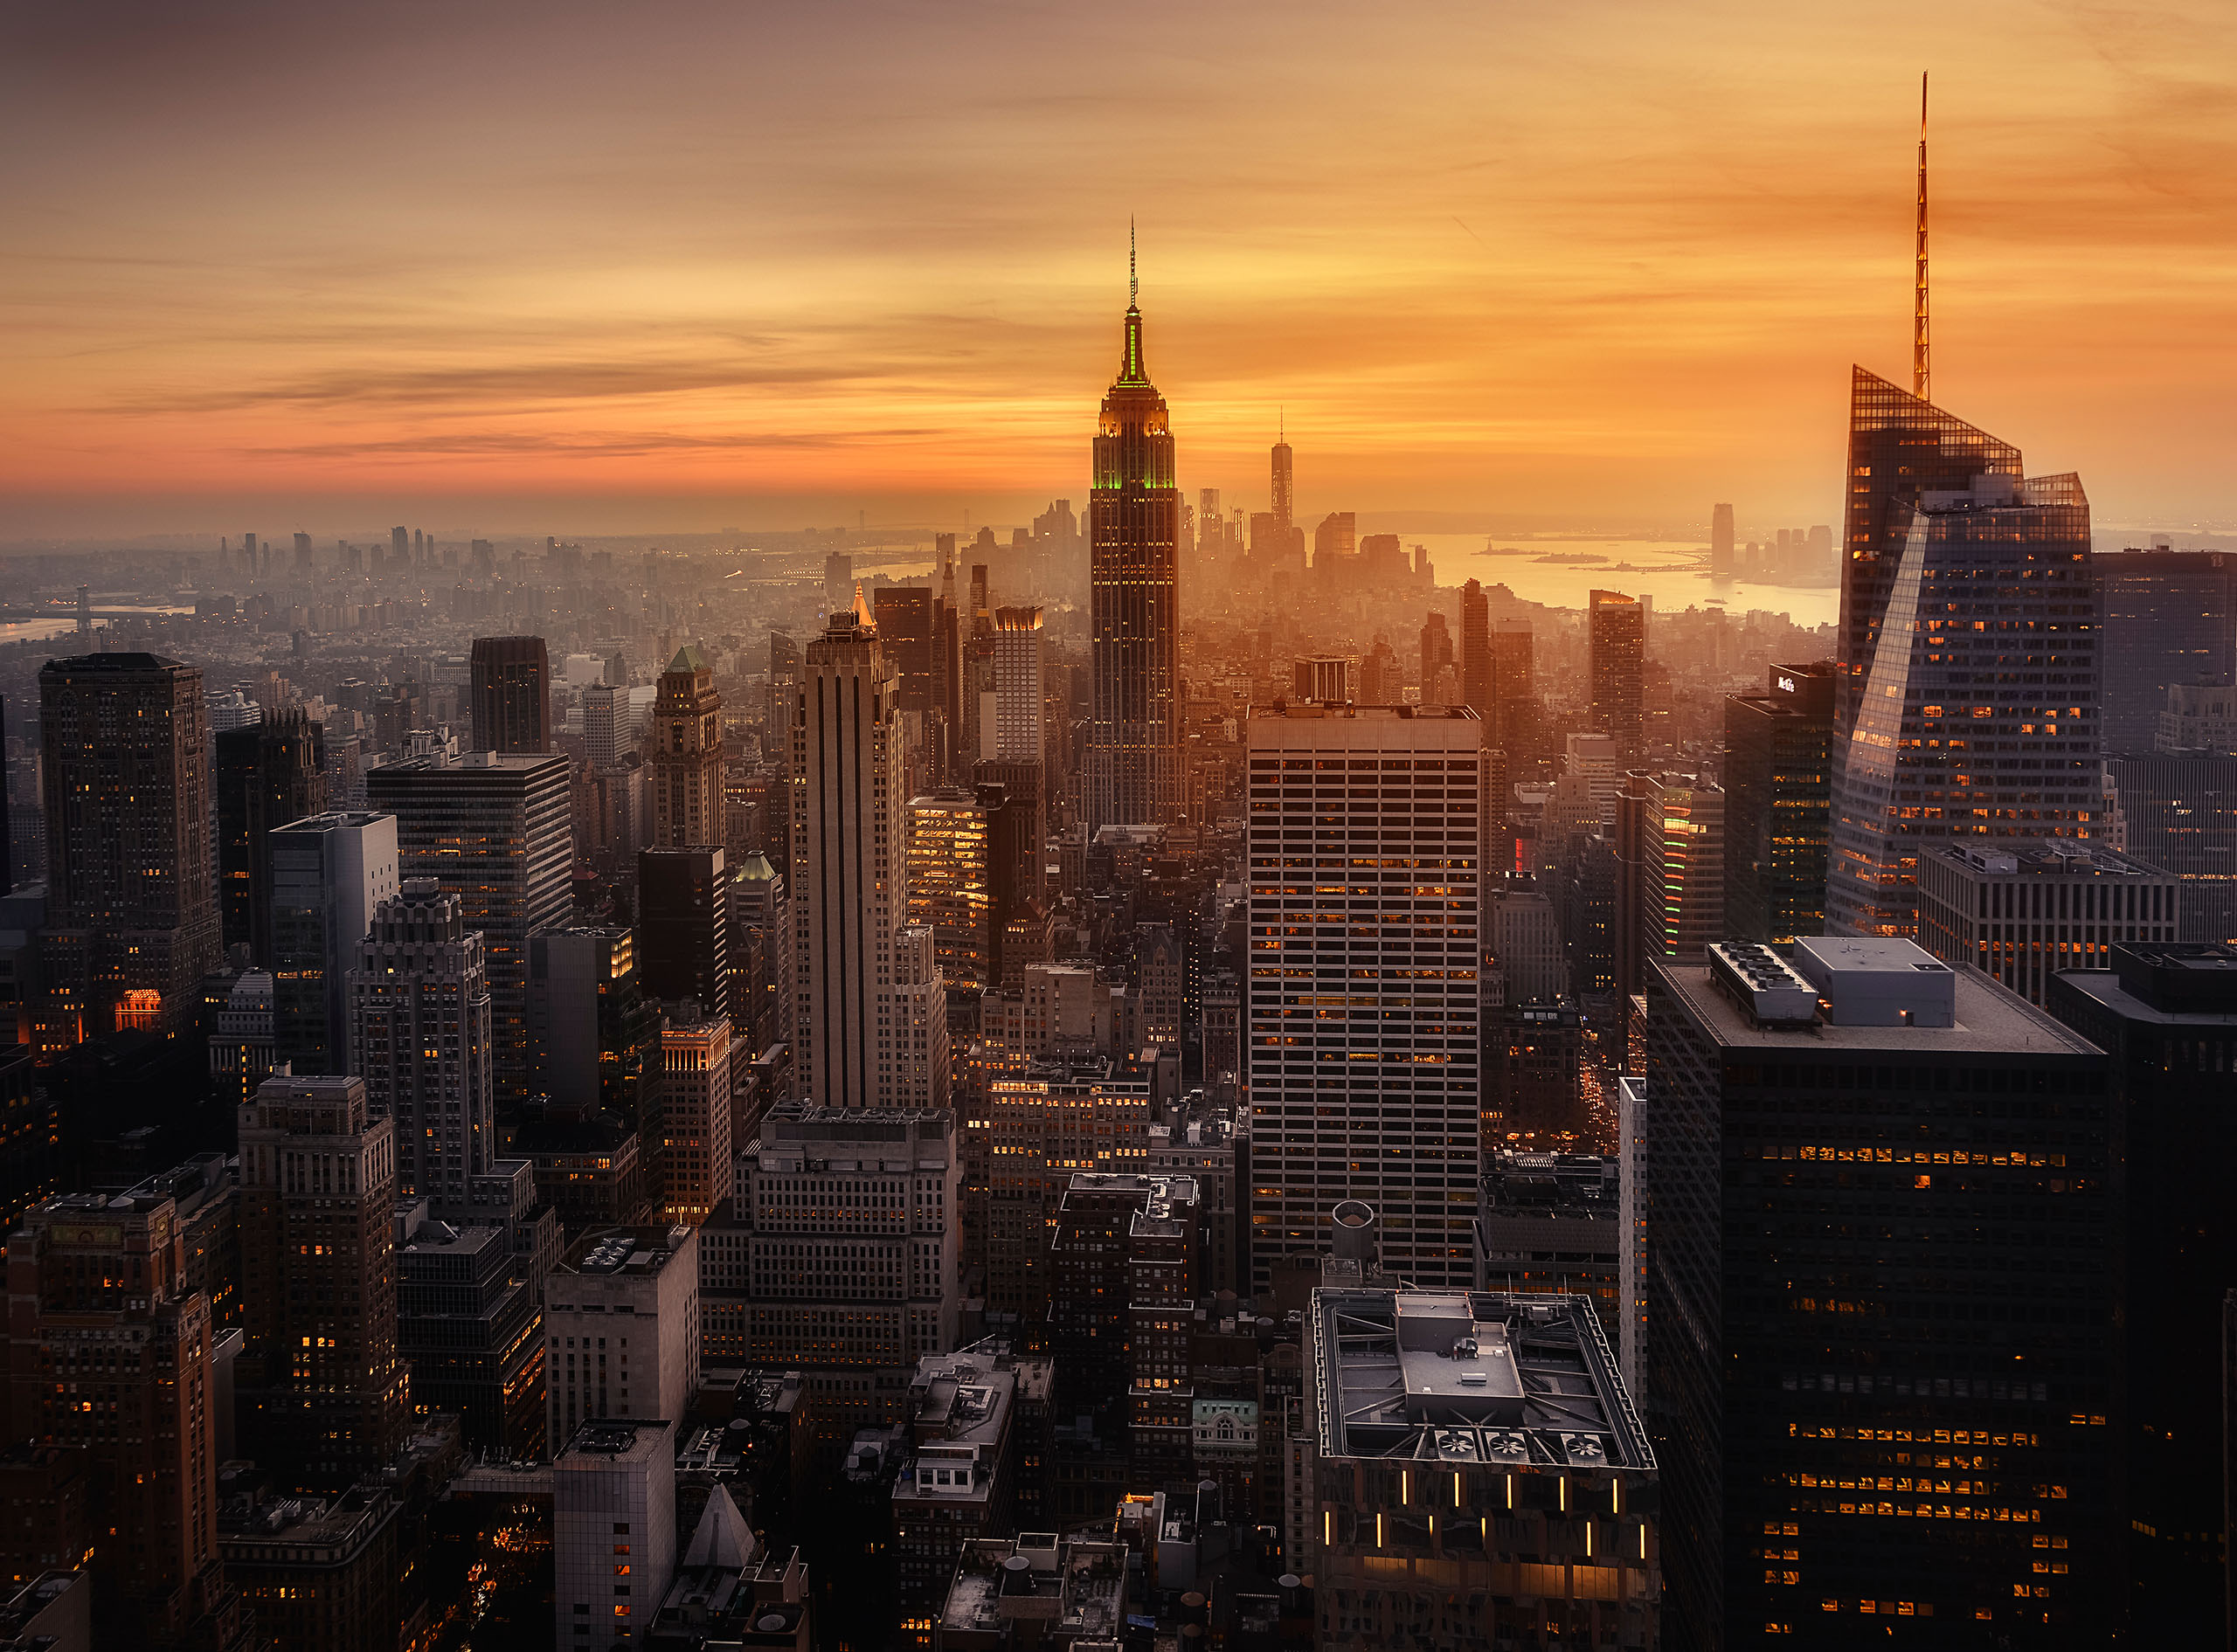
Suddenly, during the turn between the Hummingbird and the Spider, the Pan-American Highway appeared in all its glory beneath my window, forming a black "S" between the hills. The picture that I had envisaged before the trip and had remained dormant in my mind surprisingly materialized right outside my window. I took two seconds to compose and only one second to shoot; there was no time to think about it. I knew I had a good shot, but sitting in the plane I felt as though I had been thrown back into my film days: wait patiently until it's processed to find out if I'll be happy or disappointed.
Ninety percent of my post-processing workflow takes place in Adobe Lightroom. Recently I have integrated OnOne Perfect Effects plugin into it, but just in some cases (it's still under study). My workstation is a Mac mini with a 24” Dell monitor, and I use a Wacom Intuos 4 Small Tablet.
This picture was processed in Lightroom only. I use an import preset that imports Canon RAW files, converts them to DNG format, applies the Lens Profile Correction, removes by default the chromatic aberration and sets all parameters to 0, except for Exposure which is set to –1.0. Most of the post-processing effort this time was aimed at managing a noisy reflection in the upper left part of the image, which was caused by the plane's window.
These are the steps I took to process the photo:
1) Made a slight crop to eliminate a disturbing black portion of the ground in the bottom-left corner.
2) Exposure verification and then set to –1.10.
3) Shadows reduced to –22 to enhance the blacks.
4) Whites set to +71 and Blacks set to –56 to increase the contrast.
5) Clarity set to +42 to enhance midtones.
6) Vibrance set to +42 to warm and enrich the colors without over-saturating the picture (I do not like over-saturated photos).
7) In the Tone Curve panel, set Point Curve to Strong Contrast.
8) Manually retouched and reduced the window reflection. I tried to reduce a noisy, square flare by cloning and copying part of an unaffected portion of the landscape onto the affected area, using the Spot Removal tool. This action was applied on the upper left part of the image.
9) The Radial Filter tool (Exposure set to –30 and Highlights set to –48) was applied to create a vignette effect and to lighten the road between the hills (an oval vignette with its center positioned on 1/3 of the lower, straight part of the road).
10) Applied Sharpening manually, setting Amount to 90, Radius to 1.4 (due to the fact that the picture does not have frequent or small patterns) and Masking to 70, using the Alt+Masking cursor.
11) Exported the image. I used the Publish Services feature to create a standard preset for the pictures I upload to 1x.com. With this tool, I have an easy way to control which picture I've already selected to be uploaded to 1x.com and a single export preset to apply to them. All of the images are exported to an operating system folder and then manually uploaded to 1x.
1) The context in which this picture was taken is quite peculiar: a small airplane cabin. The most important tip I can offer is related to the equipment preparation. With no space and no time to change lenses, try to have with you the gear that you are most comfortable using. With that said, I have one suggestion to keep in mind: a zoom lens will provide you with some flexibility in terms of framing.
2) Remember that you can find a good shot that may not include the “protagonist,” i.e., the main subject that you had planned to see and photograph. (In my case, I shot an unplanned image of the Pan-American instead of the Nazca Lines.)
3) Do not forget the old golden rule: f/8 and be there.
I'm from Italy. Photography is the common denominator of most of my interests — travel, nature, visual arts and sports. Photography is the starting point and the incentive to study photographers' and visual artists' works, books and writings. It's just the first step of a long walk that will have a lot of interesting diversions along the way.
My passion has its roots in analog film back in the '90s, and in those same years, in the accidental reading of a book by Charlie Waite, an English landscape master, that I found in the living room of a Scottish youth hostel. Immediately after I read it, I bought my own copy in an Edinburgh bookstore.