
|
|
|
|
by Editor Peter Walmsley
Still life photography shows off the photographer’s skills in telling a story with inanimate objects through composition, lighting and depth of field. Bold simple shapes often work best and unless there’s a good reason to draw the eye to a particular part of the scene, front-to-back sharpness will be the aim. But even with brightly lit scenes and small apertures, at close range achieving a significant depth of field can be a considerable challenge.
One therefore often has to resort to focus stacking: the technique of capturing images at several different points of focus and combining them later in software.
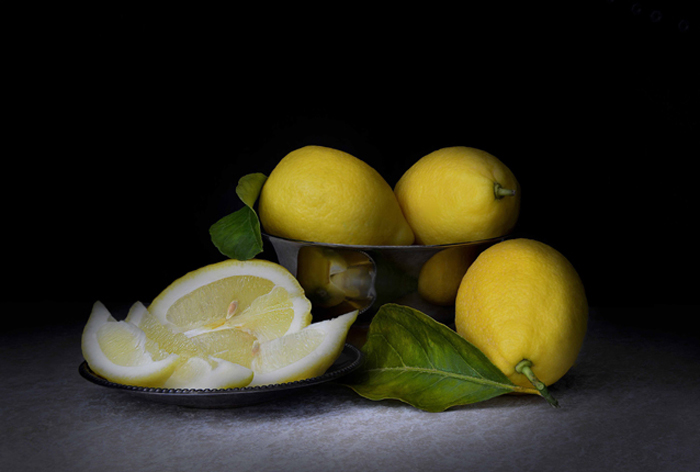
"Joys of Life – Cleanliness is next to Godliness" © Daan Oliver
Lens 50mm . Aperture f/6.3 . Subject distance 890mm . No of focus points 14
It is probably well known to 1x readers that very small apertures do not produce sharp images due to diffraction. Typically one is therefore looking for the aperture in a lens which produces the sharpest image – the sweet spot. Usually this will lie in the range f5.6 – f11 and often 2 or 3 stops from maximum aperture.
How to go about it is as follows. Put your camera on a tripod and compose your scene. Take some test shots to set the exposure (and usually I expose to the right so that the brightest highlight just touches the right hand edge of the histogram) and then turn the camera setting to manual with this exposure. In doing this you may want to set the focus point on the closest part of the image you want to be sharp and this can be done either through the viewfinder or in live view.
At this point you may want to use an online depth of field calculator to get an idea of the number of focus steps you will need. There are many available on the internet. Enter your image format (e.g. 35mm), lens focal length, aperture and focus distance and the tool will return your near and far limits for acceptable sharpness. Using this information, work out the distance to move your next focus point to and take another frame, repeating until you reach the furthest point you wish to retain in focus.
With the image files transferred to the computer, the next stage is to stack them in Photoshop. With acknowledgement to: https://digital-photography-school.com/a-beginners-guide-to-focus-stacking/
these are the steps:
* Open Photoshop
* Get each image on a separate layer: Under File, choose Scripts and Load files into stack. Click Browse and select all the images
* Check the box for Attempts to Automatically Align Source Images.
* Click OK and each of the images will open into a new layer in Photoshop.
* Open the Layer palette and select All Layers.
* Under Edit, select Auto-Blend Layers.
* Check the box for Stack Images and Seamless Tones and Colors. Optionally, select Content Aware Fill Transparent Areas, which will fill any transparent areas generated by aligning images in step 3.
* Click OK
* Flatten the image by selecting Layer/Flatten image and save.
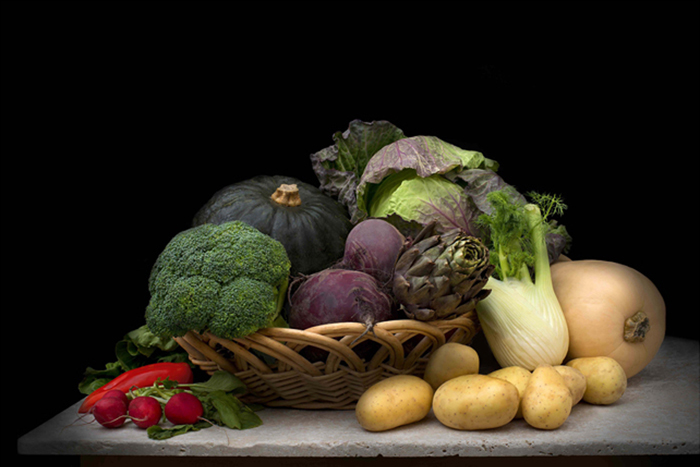
"Joys of Life – Earthly Pleasures" © Daan Oliver
Lens 50mm . Aperture f/8 . Subject distance 1m . No of focus points 22
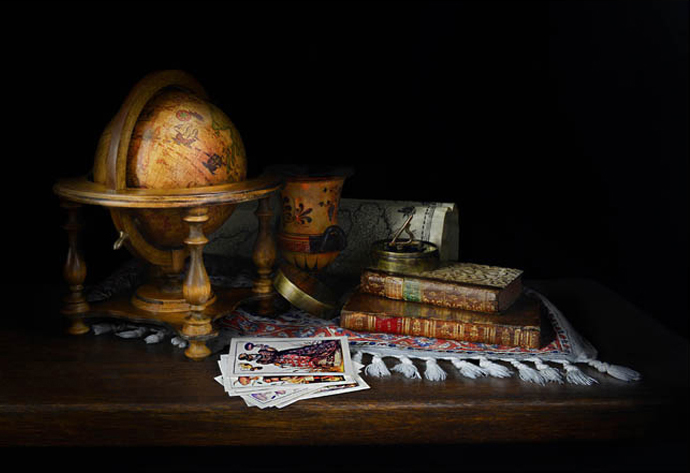
"Earning a Living – In Search of Wealth" © Daan Oliver
Lens 32mm . Aperture f/8 . Subject distance 140mm . No of focus points 22

"Earning a Living – The Lawyer's Letter" © Daan Oliver
Lens 35mm . Aperture f/6.3 . Subject distance 1.5m . No of focus points 22
Thanks to Daan Oliver for providing the images and settings.
 | Write |
 | Thierry Lagandré (Transgressed Light) PRO Hi, very very good lesson, I am going to try asap :) :) thank you |
 | Miro Susta CREW Peter, many thanks for this interesting write-up and for the lecture. I am not Still Life photographer but for sure I will try (following your instructions). Also many thanks for the beautiful photos, superb photo work indeed. Yvette many thanks for excellent editing. |