I have always been attracted to images that have one still object with other objects moving around it. To convey a sense of movement, photographers often rely on objects that are in constant motion, such as flowing water, flying birds or high-speed trains. I personally love to experiment with people walking through the frame, always using something stationary to anchor my subjects and to complement their motion.
The torii gates in Fushimi Inari shrine in Kyoto are a wonderful place to create these kinds of pictures. Fushimi Inari shrine is dedicated to Inari, the god of rice. At the very back of the shrine's main grounds is the entrance to the hiking trail, which is covered by the torii gates.
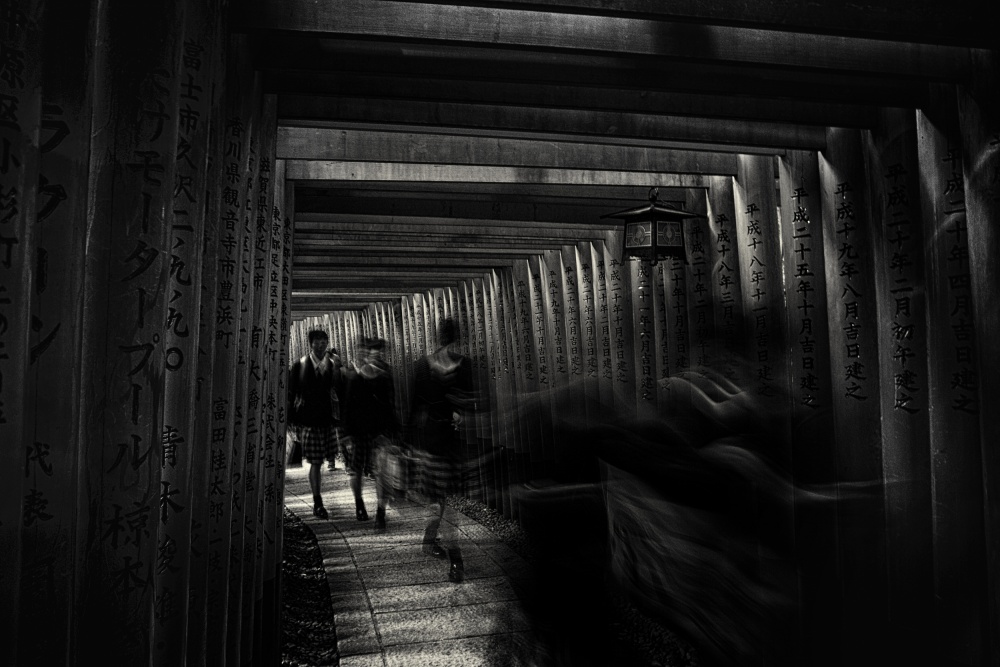
The trail starts with two dense, parallel rows of gates called Senbon Torii ("Thousands of Torii Gates"). Each torii gate along the trail has been donated by either individuals or companies, and the inscription of each benefactor's name and the date of their donation can be found on the back of each gate. We started our walk through the thousands of vermilion gates ...

"The beautiful Japanese characters on the back of gates were very prominent — an added bonus that elevated the drama in the photo."
"At one point I noticed a small group of schoolgirls in uniform approaching me, and I knew they would help create the perfect combination I was looking for."
At one point I noticed a small group of schoolgirls in uniform approaching me, and I knew they would help create the perfect combination I was looking for. I was happy with the result (the RAW file is shown below). At first glance the brilliant shades of vermilion and the black letters make a strong visual impact. Also, the polarizing filter that I used added to the contrast and the color gradient.

POST PROCESSING
The image was processed in Canon's Digital Photo Professional RAW processing software (DPP), Photoshop CS5 and Nik Software's Silver Efex Pro 2 plugin.
Because there was such a wide range of tonal gradients in the top-right part of the gates, along with the dappled light shining between them, I knew that a monochrome version of this image would be more effective, so early on I planned to convert the image to black and white.
1) I opened the image in DPP and made some basic adjustments to the exposure and contrast. Exposure was set to –0.67 to accentuate the contrast and pump up the color, Contrast was set to +2, Highlights to –1 and Sharpness to +5.
2) I exported the image to Photoshop CS5 and desaturated it, converting it to black and white.
3) The image was opened in Nik Silver Efex Pro 2 plugin to improve the black and white conversion. I tried using the presets in Silver Efex Pro, but the preset I eventually chose had to be modified to create the effect I wanted. The presets in Nik Silver Efex are amazing filters, but they do require a good deal of fine-tuning.
I selected the Wet Rocks preset since it was the only filter that could add grain to the very smooth looking surface of the gates. To fine-tune the filter, I needed to increase the overall Brightness and Contrast in the image and adjust the Structure settings as well. After experimenting with the different values, I increased the Structure Highlights and Fine Structure, adding a grainy effect to the torii gates.
4) The Brush feature in Silver Efex comes in very handy because it can be used as a mask for editing. I selected the Brush (the button is located in the bottom-right corner of the interface) and painted on the gates and the inscriptions so they appeared a little grainy and had the tonal gradations that I wanted.
5) The walkway looked overexposed, so I again opened the image in Silver Efex Pro and selected the Underexpose preset. I used the Brush again as well to paint over the walkway, darkening it to match the torii gates.
6) Back in Photoshop, I dodged (lightened) only the inscriptions so they stood out and were more legible.
7) The last step was to sharpen specific areas in the image. Using the Quick Selection tool, I selected only the gates and sharpened them by applying the Unsharp Mask filter (Amount set to 100 and Radius to 1.2).
The image was ready; I now had the dark mood that I wanted.
1) Fushimi Inari shrine is an awesome place to shoot architecture, portraits, structural abstracts and also these torii gates. The hike through the gates takes you to Mount Inari, but the further you walk, the more space there is between the gates. So these kinds of images can only be made near the entrance to the hiking trail.
2) There is no need to take a tripod with you to the gates because there isn't enough room to set it up, and it's crowded with people most of the time too. A monopod would be more convenient.
3) Sunlight helps a lot to create amazing colors in the tunnel of gates, so even if you get there a little later in the morning, say 10:00 a.m., don't be discouraged.
4) The torii gates act as super diffusers.
5) If you are handholding the camera, lean against something stationary to stabilize yourself and hold your breath to minimize camera shake. It helps a lot.
6) If you are using a polarizing filter on the lens, make sure you rotate it to boost the contrast in the RAW file. That will be a big advantage later on in post-processing.
7) Remember that no color is just as important as many colors. The tonal contrasts and gradations must always be taken care of when you're shooting; otherwise, the image will turn out flat.
8) No matter how often a particular place is visited and photographed, there is always potential for a new, creative and unseen image.
I live in a town called Alibag, near Mumbai in western India. I started photography in 2011 and I've been learning ever since. More than the images I make, I love the path that I am on. It's something that satiates my soul and mind; it's more of a meditation for me. By profession I am a controls engineer in a steel industry, and I take time out for photography as often as I can.