Try 1x for free
1x is a curated photo gallery where every image have been handpicked for their high quality. With a membership, you can take part in the curation process and also try uploading your own best photos and see if they are good enough to make it all the way.
Right now you get one month for free when signing up for a PRO account. You can cancel anytime without being charged.
Try for free   No thanks
Magazine
My Lil' Red Devils

by Ari Mahardhika

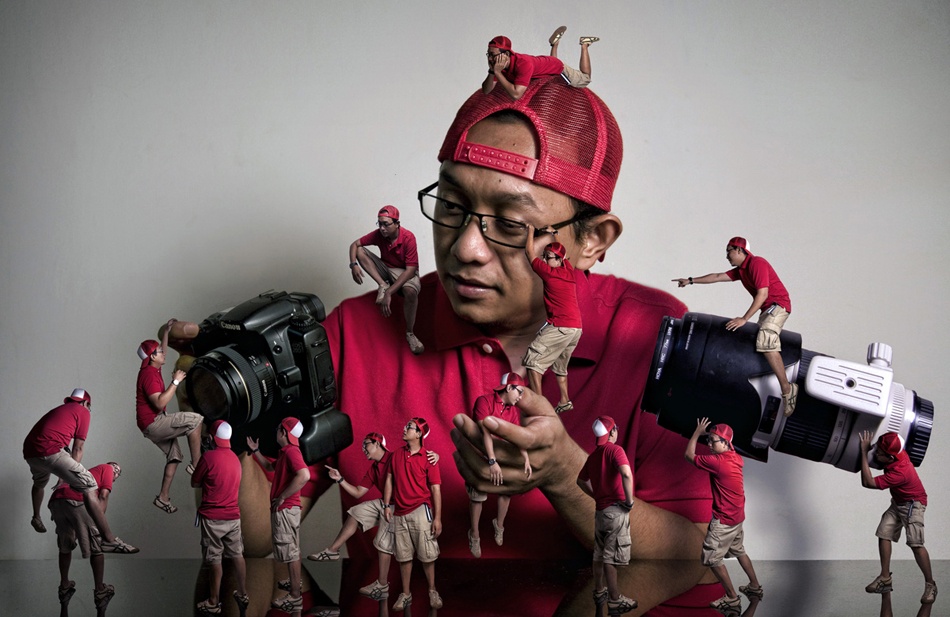
This picture shows a mixture of thoughts that I have expressed in the form of fractions of myself, illustrating how we sometimes have conversations, discussions, even conflicts with ourselves in our head. I wanted to tell this story by creating scaled-down identical versions of myself in an intriguing photomontage. I also wanted it to be entertaining to the viewers by presenting it in a fun and playful way.


Canon 40D  .  Canon 17-35mm f/4-5.6  .  35mmmm  .  1/30ss  .  f/5.6  .  ISO100

 
I always visualize my work by drawing a sketch (see below). For this idea I wanted a person to be the main character playing around with his camera and the “Mini-Me's” to be added in a way that would represent my thoughts. I tried to figure out how everything would work together as a scene, making notes on camera angles and lighting arrangements that would help to create the illusion that every single subject was taken at the same time. I wanted the final product to exhibit my Photoshop skills as well as some of my knowledge of photography.


Figure 1. Before and After Sketch Drawings


I set my camera on a tripod and self-timer since I didn’t have a remote trigger. A temporary subject was placed in front of the camera to automatically set the focus, and I then switched to manual so it wouldn’t shift focus when I hit the shutter button. An aperture of f/5.6 was used to ensure sharpness since I was shooting in manual mode, so if I was standing too close or too far from the point where the camera was focused, it would make the subject less sharp.

I used off-camera flash and wanted to light the scene from the side, creating shadows and giving more depth to the subjects and the overall image. I shot through an umbrella to spread the light and soften the shadows. I positioned the flash approximately 45 degrees to the camera on the right side and aimed it down about 45 degrees. I used a Canon Speedlite 580EX II off-camera flash, a Canon Speedlite ST-E2 Transmitter and a shoot-through umbrella diffuser.


Figure 2. Lighting Schemes and Shadow Placement


I wanted to take advantage of the ambient light. The room had a ceiling light with a diffuser, so the room was evenly lit and the white floor and walls made the ambient slightly brighter. I needed a relatively quick shutter speed to make sure I didn’t blur the image. I didn’t want to kill the ambient light; at same time, I want to keep digital noise to a minimum and ensure that enough light was captured. In the end I had to work with 1/30 second shutter speed, ISO 100 and the flash was shot with E-TTL.

"I set the camera's position and angle based on the final image I wanted to achieve. It was important to get this right because it would be used as a reference for the subsequent images."

I first shot the main picture. I set the camera's position and angle based on the final image I wanted to achieve. It was important to get this right because it would be used as a reference for the subsequent images. I positioned the camera at approximately chest level and set that as the horizon level. Focal length was set to 35 mm to minimize distortion since this would affect how the pictures of the Mini-Me's would be taken; no matter where they were positioned, I needed to match the vantage point as seen in the main scene.

Then I took pictures of various poses according to the sketch. The number of pictures for each pose varied, and I took extra shots to have options when I later constructed the composition. I had to use my imagination regarding the poses of the Mini-Me's in the scene by visualizing the final image. Some shots were a bit tricky because I had to synchronize my pose with the self-timer as I jumped or moved.


Figure 3. Taking pictures of ‘Mini-me’


The Mini-Me's that were placed below the horizon line of the scene were shot from a high angle, aiming the camera down. The Mini-Me's above the horizon were shot from a low angle — the camera was positioned at waist level, even with the horizon and aiming upward.


Figure 4. Camera Angle and Position


I took different photos specifically for the reflections. I didn’t want to copy and flip the original object because it wouldn’t look realistic. This strengthened the illusion of the montage.


Figure 5. Adding Reflections


The outcome was better than I hoped for. The photo shoot was quite exhausting because I had to be the photographer and do all the poses as well; not quite knowing if what I was shooting would work or not was pretty challenging. But I enjoyed seeing it all coming together and was very pleased with the end result.
 
POST PROCESSING
I used Photoshop to process the images and create the montage.

1) After selecting the best pictures, I processed each Mini-Me image.

2) The first step was to remove the background. I opened the main image and copied it, creating a new layer. Working on the copied layer, I used the Polygonal Lasso tool to trace the edges of the subject. I set Feather to 0 for a more accurate tracing. Once it was outlined, I right-clicked, selected Refine Edge and changed the Radius to 1 pixel, to make the edges smoother.


Figure 6. Removing Background


I inversed the selection so that only the background was selected, and then I deleted it.


Figure 6. Removing Background


3) Once all the images had been removed from their backgrounds, I started working on the montage. I dragged all of the pictures into one file (the main image being the background layer) and positioned each Mini-Me according to the original sketch. 

4) I used the resolution of the main image as the size of the final image. The Mini-Me's were shot at the same resolution, so they had to be resized accordingly. This would make them appear sharper than the main subject. I sharpened the main image by applying the Unsharp Mask filter (Amount 50-70%, Radius 1 pixel and Threshold 0) to match the sharpness of the Mini-Me's.


Figure 7. Using Unsharp Mask filter


5) Next I added the reflections by placing the reflection images under each Mini-Me layer that needed a reflection. The brightness of the image had to be adjusted to match the actual reflection seen on the main image.

4) Shadows were then painted in according to the direction of the light, which came from the right side. I created shadows on the left of each Mini-Me, making sure that the shadows fell on anything in their path, i.e., the floor or another Mini-Me. For each shadow, I created a new layer and placed it beneath each Mini-Me layer that required a shadow. Using the Brush tool, I painted the shadow with black color. I set the Brush Opacity to 100%, Hardness to 0% and Size to 100 pixels.


Figure 2. Lighting Schemes and Shadow Placement


5) To blend the shadows into the image, I applied the Gaussian Blur filter to each of them (Radius set anywhere between 50 and 60 pixels), reduced the layers' Opacity anywhere between 30% and 50% and changed their blending modes to either Multiply or Soft Light. These values varied depending on their proximity to the shadows in the main image. The goal was to make the image look realistic, as though all of the Mini-Me's were in the photo together. So it was extremely important to make them appear as if they were lit by the same light source at the same time.


Figure 8. Adding Shadows


6) After I had finished adding the shadows, all of the layers were flattened. I wanted a sharp, crisp image, but at the same time I wanted to keep it subtle. So I sharpened the image again by applying the Unsharp Mask filter, Amount set to 50-60%. The Dodge and Burn tools were used to add more shadow and highlight contrast in some selected areas. For the Dodge Brush I set the Range to Highlights, and for the Burn Brush I set the Range to Shadows. Exposure was set to 10%, and the Brush was applied repeatedly until the desired effect was achieved.
 
TIPS
1) Planning is key. More time should be spent at this stage to perform effectively and efficiently throughout the process. Turning an idea into a sketch is a very helpful practice; it is a great reference tool that allows you to remain consistent with the original idea. 

2) Maintain a realistic look to make it believable; it's already obvious it was done in Photoshop. Paying attention to lighting, shadows, reflections and details is very important to achieve a realistic montage.

3) Create a good composition to interest the viewer and make him look again. Craft the image to look lively. Have the subjects interact with each other and/or the scene.
 
BIOGRAPHY
I’m an Indonesian product designer working for a Czech company based in Hong Kong. I have a degree in architectural engineering and have been working as a designer for many years. 

I have been taking photos for 10 years, as a hobby and an amateur enthusiast. I’ve done a few weddings and event photography in the past and recently started to focus on landscape photography. I shoot many different genres because I don’t want be limited to one style. I love to create images. I want to be able to see and capture the essence of moments, or scenic landscapes, and express them in a photograph.
 
Write
Ari, That's really a fantastic montage! It must have taken many, many hours or days. I really enjoyed the finished photo. Thank you for all the editing tips!